Homemade Hummus Hits the Spot

Click here to view recipe.

A plate of fresh hummus (in Acco at an Arab market)

“I’m in Israel!” These are the words that happily ran through my mind as our plane touched down in

Tel Aviv last month. I kept pinching myself and telling myself that it was true … I was in Israel. This was my fourth journey to this beautiful country. My first trip was in 1974; ten years later I attended my nephew’s Bar Mitzvah; I returned with Sister Susan for a group tour in 2000; and now I was finally back. For such an ancient country, I felt surprised to see how much things had changed in the decade since my previous visit. I noticed way more shops and a lot more technology – basically everything seemed more modern. Thankfully – one thing seems to remain the same…hummus. One of my favorite things to eat, it remains a ubiquitous food in Israel. And it is goooooood.

Spices at a Tel Aviv market

Call me  a bean lover and a huge hummus fan. Chickpeas (aka garbanzo beans) serve as a kitchen staple in my global kitchen. These beans are used throughout the Mediterranean areas of the world and I’ve learned to include them in all kinds of ways. I cook them fresh and have some frozen in small quantities for added protein in salads, soups, and even main dishes.

While I typically don’t like to boast, I’ll pit my version of hummus against almost anyone else’s. My recipe is adopted from Cooks Illustrated magazine – though I changed quantities and added my own twist. I begin with dried garbanzo beans, although canned beans are OK if you aren’t into cooking beans. After I soak and simmer the garbanzos, I combine them with freshly squeezed lime juice. Most recipes list lemon juice as an ingredient  but I have to be different, and I always have a bag of limes in my refrigerator. My little “twist”, or signature, involves the addition of smoked paprika – a spice I simply adore. It adds another dimension to hummus – not readily identifiable to most – but it infuses a complexity to the final dish.

I use the savory spread to build a vegetable sandwich where I layer slivers of colorful peppers, thinly sliced cucumber, some pickled onions, shredded carrot, arugula … just typing this makes my mouth water. Or I serve hummus as a dip with blanched or raw vegetables, snow peas, carrot slices, and pita bread or even my seeded crackers. Hummus freezes for up to six months so when my mission is to prepare hummus, I do it in a big way and freeze a few pint containers. Yes, I know you can buy hummus at Costco, Trader Joes or most grocery stores in the US, but try making it just once. You might discover, as I did, that it is easy to prepare and way better than anything you can buy.

B’tayavon! (Hebrew for Bon Appétit)

Homemade Hummus

pf-icon2

Ingredients:
  • ¼ cup juice from the garbanzo beans (if you make your own) OR ¼ cup water if from a can
  • ⅓ cup fresh lime juice
  • ⅓ cup tahini, stirred well (I use Joyva brand)
  • 2 Tbsp organic extra virgin olive oil PLUS some to drizzle on top and garnish
  • 14 oz can of drained, rinsed garbanzo beans OR 2 cups freshly cooked beans
  • 1 clove garlic, cut into 4 pieces
  • 1 tsp fine sea salt
  • 1 tsp smoked paprika
  • pinch cayenne pepper
Instructions:

Combine lime juice and water (or bean juice if using homemade beans) in small bowl.

Whisk together tahini and the olive oil in second small bowl. It takes a bit of elbow grease to combine.

In a food processor, pulse beans, garlic, salt, smoked paprika, and cayenne. After it is chopped a bit whirl them together for about 15 more seconds. Scrape the sides of the work bowl with a rubber spatula. With the food processor running, add lime juice-water mixture in a steady stream through the feed tube. Scrape down the work bowl and keep processing for another 60 seconds.

With the machine running, add oil-tahini mixture in steady stream through feed tube; continue to whirl until the hummus is smooth and creamy, about 15 seconds, scraping down bowl as needed.

Taste the mixture and add more lime juice or salt as needed. Personally, I always add a lot more lime juice and a little more salt too. Put the hummus into a storage container and seal it, and store it in the refrigerator for at least an hour. I like to serve this at room temperature so take it out of the fridge in plenty of time. Drizzle generously with olive oil and serve.

This keeps really well in the freezer for up to 2 months and in the refrigerator for at least a week well covered.

Share
Posted in Appetizer, Condiment, Middle East | Tagged , , | 4 Comments

Pavatel – Puckery Plum Preserves

Click here to view recipe.

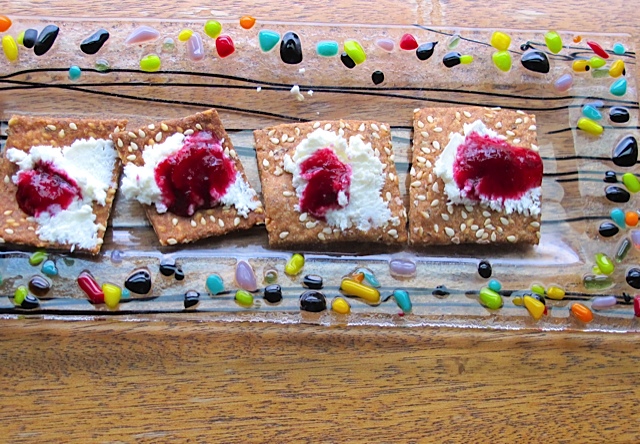
Plum Jam on Homemade Crackers

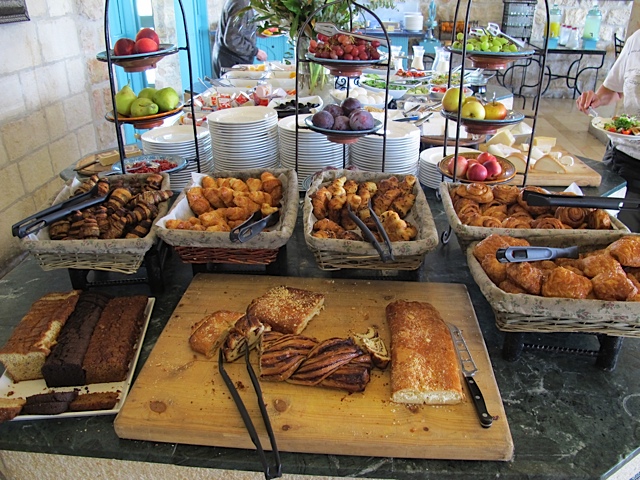
During my recent travels through Israel, one of the many things that made me over-the-moon happy happened to be the “Israeli Breakfast”- a veritable feast. A number of the hotels in this country provide a large buffet breakfast as part of their nightly fee. You cannot begin to imagine, if you haven’t actually seen the spread, how unbelievable and daunting this meal can be. The self -serve tables included countless types of fruits and juices and many different vegetable salads (and yes, vegetables provided a wonderful start to my day!). Cheeses of every kind, texture and variety, nuts, seeds, granola, hot and cold eggs, soufflés, frittatas, kugels, coffee, tea, breads, pastry … even dessert. Needless to say the times we stayed in nice hotels (five nights) we were so full after breakfast that we couldn’t even think about food until early evening. This is remarkable given that Israel is replete with street food on nearly every corner that would typically make me stop in my tracks.

Buffet Spread in Israel

Let’s go back in time – back about 62 years. When I was young, my aunts in Marshalltown, Iowa (a.k.a the “original” sisters) were fantastic cooks and bakers. Their kitchen in the country was literally the cleanest place you can imagine – after all, they didn’t have children. They always brought jars of plum preserves to our family of seven whenever they made the five hour trek to visit us. Their small glass containers always were topped with a layer of thick parafin wax and a wick to remove the wax. I guess this was their way of keeping out air and preserving the jam, or “Pavatel” (PAW-va-tell) as we called it – and my Aunt Lena learned how to make this in Russia before she immigrated to the United States. This type of condiment is Eastern European in origin and coincidentally my husband’s Polish grandmother also made a very similar type of preserves that we would eat smeared on thick, warm rye bread (in Poland this is known as Powidlas).

Now … back to the Israeli breakfast experience. Our last hotel breakfast included fresh plum preserves. I could taste the presence of star anise, which gave it a notable flavor. Every single day I took scoops of the jam and topped my yogurt, my granola, and even ate it with fresh cheese and bread. What I wouldn’t give for an Israeli breakfast right now!

And I’ve always had a soft spot for Italian plums. They are my favorite for rustic tarts or even purple plum pie. I stew them with a little water, a cinnamon stick and a drop of honey if I need the sweetness and eat this kind of like applesauce. Recently I made this for my grandkids and because they weren’t crazy about the plum peels in the stewed fruit, I pureed the whole pan full! They ate it like that and I put some into a squeeze bottle, thinned it more with some orange juice and used this to garnish plates of salad and even a sweet and sour chicken dish.

Here is my version of Pavatel – with the addition of star anise and lemon peel. If you’re not a star anise fan or a licorice lover, substitute about a one-inch piece of cinnamon.

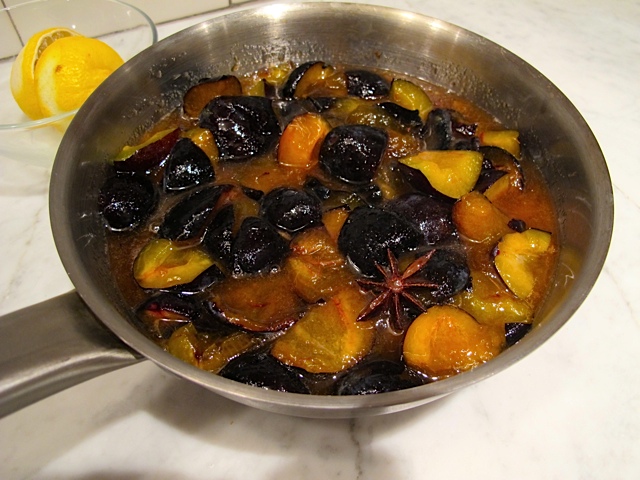
Macerated Plums-see the star anise?

“Pavatel”- Italian Plum Jam with Star Anise

Makes 5-6 cups

pf-icon2

Ingredients
  • 4 lbs chopped Italian plums or santa rosa plums(aka Damson plums–dark purple peels, small and oval shaped with yellow green pulp)
  • 3 1/4 cups cup granulated sugar
  • 3 whole dried star anise blossoms (if desired)
  • 3 –2-inch strips x ½ inch strips of lemon zest
Instructions:

After washing the fruit, I prepare the plums by cutting each in half, removing the center seed and then cutting into half again to make quarters. The stone in the middle pulls away easily from the flesh. You can substitute a quarter of the plums with halved red seedless grapes like they sometimes do in Israel.

Combine quartered plums, sugar, strips of lemon zest and star anise blossoms if you are using that.. Stir together and let the mixture sit in a large sauce pan covered for at least an hour, or until the fruit has gotten quite syrupy. Remove all of  the star anise blossoms and all the lemon peel.

Place over medium high heat. Bring to a slight boil and cook for about 75-90  minutes on medium heat, stirring every five minutes until the jam bubbles and thickens. I remove the white foamy stuff that rises to the top.  At first the mixture will look very watery then the bubbles will change as the syrup thickens.  You can test it by seeing if it will stay put on a spoon or passes the frozen plate test*. The jam should be a dark ruby color.

I don’t can the jam; I just put it into clean jars and refrigerate. I serve it on my seeded crackers with spreadable goat cheese topped with just a dollop of the jam, and add thin slices of ripe pears or concord grapes to the plate. I love to stir this delectable treat into plain yogurt, slather it along with almond butter onto thick bread for a fancy “AB&J”, spoon it on top of challah French toast with some plain Greek yogurt, or even heat and serve over vanilla bean ice cream.

I have to laugh when I tell you I don’t can the jam…funny for a girl who loves to use her pressure cooker for soups, risotto, beans…but I just never got into canning. So even if you are not a jam maker, give this a try while the Italian plums are plentiful at Farmer’s markets. It keeps three weeks refrigerated or it can be frozen for up to a year.

As an aside, I often buy pounds of these Damson plums (or harvest them from a friend’s tree) and freeze them once they are quartered. I then use them throughout the year.

*The Frozen Plate test: Put two small glass or porcelain coffee saucers in the freezer while you are boiling the preserves. When you think the batch might be finished, put about a teaspoon of the jam on the one of the frozen plates and return to the freezer . After two minutes, take the saucer out of the freezer and use your index finger to push through the jam. There should be a slight film on top that “wrinkles up” as you push. If it’s not ready yet, boil the preserves for a few more minutes and repeat with the second frozen plate.

Share
Posted in Condiment, Middle East | Tagged , | 2 Comments

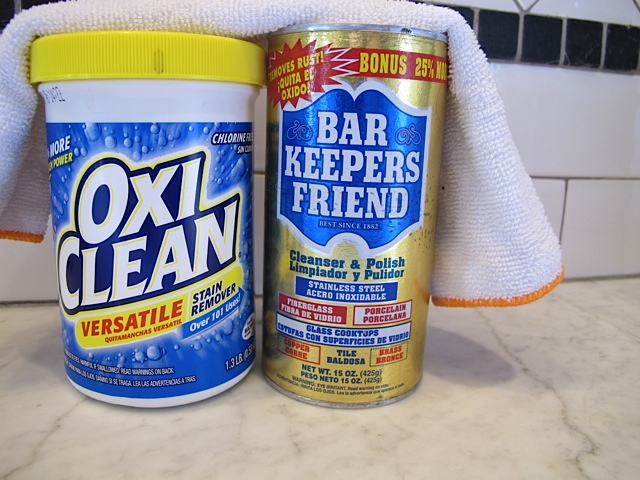
Keeping Your Kitchen Clean

My Essential Kitchen Cleaners

It’s the first Wednesday of the month again – the time when I keep things simple. And today I’m going rogue. No recipe. I know … I’m usually all about cooking. But this IS called My Global KITCHEN after all – so hopefully you’ll accept this week’s topic: kitchen cleaning.

As I mentioned in a recent post about Cooking with Friends, I am somewhat fanatical about cleanliness. And over the years I’ve come to rely on a few key products that help keep my kitchen spotless. You may be surprised to learn that these aren’t even conventional kitchen supplies!

1) OxiClean. I know – the commercials drive me crazy too. But this stuff really works! Dissolve just a bit with hot water and soak anything that stubbornly sticks to your pots or pans overnight. In the morning, you’ll need a minimum amount of elbow grease and the mess cleans up beautifully. I also soak the head of my espresso maker in some OxiClean daily to get the coffee oils out. Oh, and my oven racks, when they are disgustingly dirty, go in the bathtub overnight with some OxiClean.  Last night I miraculously cleaned my toaster oven drip pan by soaking it and going over it lightly in the morning with an SOS, and it looks spanking new, and when I burned the inside of my stainless steel saucepan (don’t ask but let’s just say my hardboiled eggs were cooking for an hour in a dry pot) the pan returned to shiny new with this marvelous powder.

2) Microfiber towels: You can buy these at Target in the Automotive section or at Bed Bath and Beyond, and they are absolutely the finest kitchen rags ever. They are inexpensive, they don’t smell, they wash well, you can squeeze them dry or use them wet to wipe down counters, floors, stainless steel, your computer screen…you name it.

3) Bar Keepers Friend: this has been my “go to” cleaner for years and I am never without several cans of the powdered version. It truly is the best bleach-free, all purpose cleaner for sinks, stovetops, cookware, bathrooms… I buy it at Home Depot or my neighborhood grocery/drug store. Read all about it – Amazon has almost 150 5-star reviews! Trust me, once you try it you’ll never want to be without it.

Readers, do you have favorite kitchen cleaning products to share?

Share
Posted in Wednesday Post | Tagged , | 6 Comments

Gazpacho, Spain and Gaudi

Click here to view recipe.

Gorgeous Gazpacho

Last November we spent almost two weeks in Spain and we spent the majority of our time in Barcelona. Almost wherever you look, structures by famous Spanish architect Antoni Gaudi rise from the pavement. He’s renowned for unbelievable religious structures (Basílica i Temple Expiatori de la Sagrada Família), stunning apartments (La Pedrera), and even decorative furniture. We walked and walked from la Sagrada Família to his apartment building to the Museo Nacional D’art de Catalunya, marveling at his genius.

Looking down from the rooftop of Gaudi's La Padrera

While art and architecture were high on our “must see” list, it shouldn’t come as a surprise that I researched Spanish cuisine ahead of time and selected a day-long market tour and cooking workshop at “Cook and Taste,” one of the best cooking schools I’ve been to IN THE WORLD. Yes, compared to other one-day cooking schools I found this to be perfect: the space was well-equipped, the recipes we made reflected authentic Spanish cuisine, the instructor Carla knew her stuff, and the class size of just 10 students seemed ideal for hands on cooking.

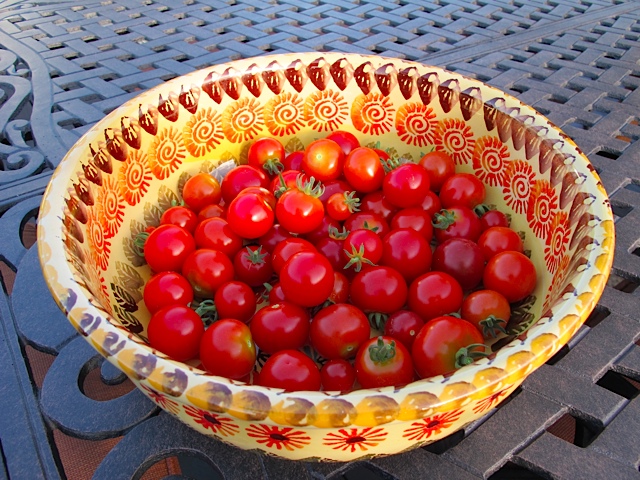
One of Carla’s most tantalizing recipes was Gazpacho, which, incidentally, appeared on virtually every menu throughout Spain. So in mid-August, when my patio cherry tomato plants produced more sweet tomatoes than I could imagine, I plucked the little darlings and made gazpacho for a Sunday evening dinner. It was a rare warm evening and this chilled soup hit the spot. Plus, every single item happened to be seasonal and available at the farmers markets – the perfect “locally grown” dish.

My very own tomatoes! Perfect for gazpacho.

My version reflects my cooking style: I streamlined the method by not peeling or seeding the tomatoes. Though I learned the original from Carla, the recipe below is really my own. Remember that you can add more or less of anything as you taste along the way.

Accompanied by toasted pumpernickel bagels with melted white cheddar cheese and a romaine- avocado-corn salad, we called it dinner.

Gazpacho

Serves 6-8

pf-icon2

Ingredients
  • 1 ½ pounds vine-ripened tomatoes, divided (cherry or regular-size tomatoes)
  • 14 oz can diced tomatoes in juice (I use organic Muir Glen fire roasted tomatoes)
  • 1 cup English cucumber, peeled and divided – remove seeds from one half only
  • ½ cup chopped red bell pepper – divided (dice half this amount into ¼ inch pieces and the other part into 1” squares)
  • ½ cup red onion, coarsely chopped
  • 1 small jalapeno pepper, seeded and coarsely chopped
  • 1 large garlic clove, minced
  • 1/3 cup good quality extra-virgin olive oil
  • 2 limes, juiced
  • 1 Tbsp balsamic vinegar
  • 2 tsp tomato paste (I keep a tube of this in the refrigerator)
  • 2 tsp Worcestershire sauce
  • ½ tsp ground cumin
  • 1 ½ tsp sea salt, or to taste
  • 1 ½ tsp granulated sugar or more to taste
  • Sriracha hot sauce-to taste ( I add a squirt at a time)
  • ½ cup tomato juice or more if you want the soup less “thick” (optional)
  • 2 Tbsp fresh basil leaves, chiffonade for garnish
Instructions

Dice half the tomatoes into ¼ inch pieces (no need to peel or seed) and the other tomatoes into 1 inch pieces.

Dice ¼ inch pieces the peeled, seeded cucumber. The other half goes with the coarsely cut tomato and doesn’t need to be seeded but should be peeled and cut into 1 inch slices.

Dice half of the red pepper into ¼ inch pieces. The other half can be in 1 inch pieces.

Put the ¼ inch diced tomato, cucumber and red pepper together into a bowl and set aside.

The rest of the tomato, cucumber and red pepper should be placed in a blender with red onion, jalapeno, garlic, olive oil, lime juice, balsamic vinegar, Worcestershire, cumin, salt, sugar, tomato paste, sriracha and canned tomatoes with juice. Pulse a few times until the large pieces start to combine and then blend about 30 seconds at high speed until smooth. Add tomato juice to thin it out a bit if you wish (I added about 1 cup).

Return the pureed mixture to a large glass bowl or container and stir in the small diced tomatoes, cucumber and red pepper. Taste and add more salt, sugar, or sriracha.

Cover and chill for 2 hours or overnight. The soup is actually better the following day, and can be served chilled or at room temperature. Serve with a chiffonade of basil on top for garnish.

Note: The color of my gazpacho is a little bit orange because some of my patio cherry tomatoes were yellow.

In Spain they flavored and garnished the soup with smoked idiazabal cheese.

My son Jake prefers the vegetables very, very finely diced rather than larger, but my husband likes the coarseness of the chopped vegetables against the smooth pureed background of the blended vegetable soup. There are smooth applesauce lovers and chunky applesauce lovers, so in the same vein you, can make this more chunky or smooth depending on your side of the aisle. Suit yourself!

Share
Posted in Europe, Soups | Tagged , , | 2 Comments

Sweetening the Jewish New Year with Chicken Thighs & Veggies

Click here to view recipe.

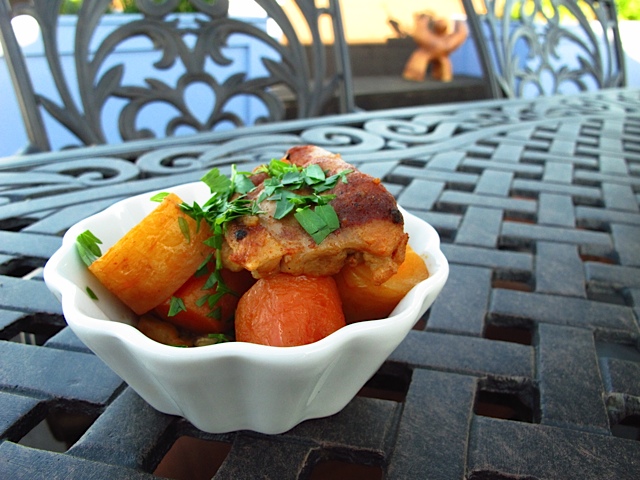
Chicken Thighs & Vegetables

I mentioned Rosh Hashana, the Jewish New Year, in last week’s post (though I forgot to mention that I always ALWAYS make rugelach on this special day!). For those of you unfamiliar with Jewish holidays, I thought I’d provide a bit more insight. Rosh Hashana is followed 10 days later by Yom Kippor, or the day to atone for the sins of the past year. After an evening meal, observant Jews fast from sundown the evening prior to this holiday until the following nightfall on the day of Yom Kippur — about 25 hours. This year (2012) Yom Kippur begins on Tuesday evening, September 25.

We always prepare comfort type food for the meal before the fast – nothing spicy, overly fatty, rich or difficult to digest. For several years, Chicken Thighs with Vegetables has been my “before the fast” main course – it comes together quickly and it’s basically one-pot cooking. Using chicken thigh meat is the key as it never dries out with stovetop braising. But the best part is the honey … coupled with the fresh, natural flavors of carrots and parsnips, it seems like the perfect element to bring some sweetness of the New Year (Rosh Hashana) into this traditionally solemn holiday.

As an aside, I often make this if I deliver a meal to friends or family in need of nourishment and it is a recipe I make upon request for my adult children when visiting them. When you tackle this simple main dish, you’ll discover that the aroma emanating from the kitchen is other-worldly. Try it, you’ll love it.

Chicken Thighs with Vegetables

Serves 6

pf-icon2

Ingredients:
  • 3 lbs chicken thighs with skin and bone left on(extra fat removed)
  • 2 Tbsp olive oil
  • 1 Tbsp sea salt
  • ½ Tbsp smoked paprika
  • 1 teaspoon ground cinnamon
  • 10 grinds of fresh ground black pepper
  • 1 large yellow pepper, seeds removed and cut into 1 inch cubes
  • 6 large carrots, cut into 1-inch pieces (I don’t peel them if organic)
  • 2 large parsnips, peeled and cut into 1 inch pieces
  • 1 Tbsp minced garlic
  • 1/3 cup fresh squeezed lemon juice
  • 2 tablespoons honey
  • ½ cup water
  • 1 Tbsp finely chopped fresh Italian parsley for garnish
Instructions:

Dry chicken thighs thoroughly with paper towels. On a piece of waxed paper or parchment paper, combine spices, salt and pepper and mix well. Press spices into the skin side of the chicken by rolling the pieces skin side down into this mix. Keep the extra spice mix for when you cook the vegetables.

Heat oil in a 12-inch heavy sauté pan over medium heat. Place chicken thighs skin side down (the side with the spice rub) and brown chicken for eight minutes. The cooked side should turn a beautiful, reddish brown color. Turn thighs over for another four minutes. If the thighs are large this might have to be done in two batches unless you have a giant skillet like mine.

Using kitchen tongs, remove chicken thighs to a dish with a bit of a lip so the juices can collect as the chicken rests. Pour off all but two tablespoons of rendered chicken fat.

Add the vegetables to the same pan. Sprinkle with any leftover spice/salt mixture you have. Cook the vegetables over medium heat, and stir occasionally for about 10 minutes.

Place the browned thighs and their juices back into the pan and gently cover with some of the vegetables. Add in the liquid, bring to a simmer and cover with a lid. Continue to simmer for another 20-30 minutes until the vegetables and chicken are cooked thoroughly, gently basting the chicken twice during this time. Before serving, put in a shallow bowl and garnish with chopped flat leaf parsley. Pass any remaining juices to pour on top of the chicken or side dish.

Notes: I sometimes use boneless skinless chicken thighs if I am in a hurry. This takes a lot less time for the meat to cook. The method is the same but after removing the thighs I sauté the vegetables for longer, say 15 minutes. Then I add the thighs and only need to cook it another five minutes or so.

I always serve this accompanied by brown rice, barley or quinoa so the pan juices aren’t swimming all over the plate. Adding broccolini, sautéed cherry tomatoes or tomato slices drizzled with olive oil makes the plate look colorful and appealing.

I have doubled it and then cooked the vegetable/chicken combo in a large Dutch oven if I am serving this for company.

And finally, every single man, woman and child who tastes this LOVES it.

Share
Posted in Poultry | Tagged , , | Leave a comment

The Chopped Liver Challenge

Click here to view recipe.

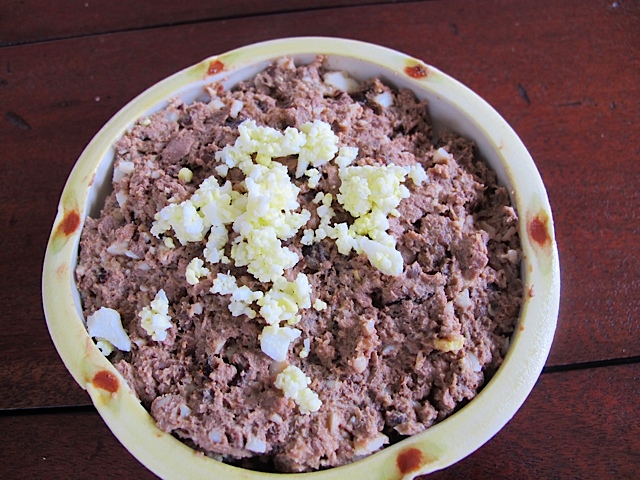
Lucious Chopped Chicken Liver

The title of this post will likely not appeal to most of you — unless, of course, you ate chopped liver for holiday celebrations throughout your life. Such is the case with me; a Jewish holiday (Passover or Rosh Hashana) wasn’t complete without a huge bowl of chopped liver to spread on matzo or challah. I recently made a batch for a close friend who had surgery. He’s an excellent cook and I know he loves my chopped liver, so I baked a fresh challah and delivered both to his house the day he came home from the hospital – likely something a little different from the traditional flower bouquet. He called 30 minutes later and gushed that the liver tasted great and that he had reserved a portion for a chopped liver sandwich the next day!

To be clear, chopped liver is NOT liver pate. It is never made with butter (heaven forbid) or sherry or anything fancy, and it has more texture than liver pate. This particular recipe veers from the original method in that I have substituted canola oil for chicken fat (shmaltz). I will confess that at times I make the liver with shmaltz, but that would be a non-starter for even the most avid chicken liver fans. Some folks fry the livers but I take the easy way out and broil them.

Organic Chicken Livers, Onions & Eggs

The chopped liver I prepare begins with 100% organic chicken liver. The liver as an organ filters all toxins from an animal’s body, so non-organic chicken liver contains byproducts of antibiotics or hormones given to conventionally raised poultry. If you eat a little bit of organic chopped liver from time to time it helps build red blood cells, and it is high in vitamin B12 and vitamin A. Yes, it contains cholesterol, but everything in moderation.

Some use calves or beef liver, but I prefer 100 per cent chicken liver. My cooking mantra is to, whenever possible, use recipes from someone who has made a particular food (especially an ethnic dish) for a long time. When it comes to Jewish foods, I highly recommend finding a Bubbie (Yiddish for grandmother) and watching her make the food you crave. Watch carefully – Bubbies don’t usually use recipes. And now I am a Bubbie, so I have some credibility here!   True to form this is the first time I really quantified this recipe!

Chopped Chicken Liver

Makes about 2 cups

pf-icon2

Ingredients:
  • 1 lb organic chicken livers
  • 1 large sweet (walla walla) onion, peeled and diced ¼ inch (you should have at least 2 cups of diced onion)
  • ¼ cup canola oil
  • 1 tsp salt
  • 4 grinds of fresh ground pepper
  • 2 hard boiled eggs, peeled
Instructions

Rinse the livers well with fresh water, drain in strainer and pat very dry with a fresh kitchen towel. Clean the livers by tearing away any yellow fat or stringy membranes, discarding any visible fat, green parts, or membrane.

Put the livers in a single layer in an oiled, foil-lined rimmed pan. Sprinkle with salt and broil 5 inches from the heat. Turn the liver with a tongs after 10-15 minutes to expose the uncooked side, sprinkle a little more salt and continue to broil until the livers are no longer pink inside (approximately another 10 minutes). For this small amount, I used my toaster oven. Sometimes you will hear a “popping” noise to indicate they are ready to turn. Cool the livers for ½ hour.

Meanwhile, in an 8 inch sauté pan, heat oil over medium heat and add the onions. Cook, stirring occasionally, over medium low heat until golden caramelized, about 25 minutes. Cool. Combine the broiled livers in this pan after they are cooked so the onions can infuse the livers.

Chop the onions with the livers in a food processor, making it as chunky or smooth as you like (I prefer in between). I then empty the processor.  You don’t need to wash the machine; just chop the eggs, reserving a bit for garnish. Add all but one Tbsp of the eggs, onions and livers together and season to taste. Use the remaining chopped egg to garnish the top.

One of my pet peeves is chicken liver (or any food for that matter) that lacks salt or taste. You can either mold this by pressing into a round bowl then inverting onto a lettuce lined plate or you can simply put it into a bowl and top with the reserved chopped egg.

My family loves this with slices of fresh challah or pumpernickel bread! And chopped liver sandwiches with lettuce are a treat if any remains after the meal.

If you are adventurous or a purist, you can substitute chicken fat (shmaltz) for the canola. It tastes out of this world but I find that with enough onion, the canola tastes just fine.

A final aside… many of you may have heard the phrase, “What am I, chopped liver??” This popular expression of frustration has always made me smile as I LOVE chopped liver. So I am laying down the gauntlet and giving you the Chopped Liver Challenge! I Hope you try it – you just might like it.

Share
Posted in Meat, Odds & Ends | Tagged | 2 Comments

Up On the Roof

My Rooftop Herb Garden

I live on the third floor of a third floor 1927 condominium overlooking Seattle, Lake Union and Puget Sound. During August this year I’ve been pretty much traveling non-stop but I’ve started a tradition for when I’m home. What’s the first thing I do each morning after I make my latte and every night as the sun sets? I climb the stairs and sit on a reclining chair up on my roof. As James Taylor sang:

“On the roof, it’s peaceful as can be

And there the world below don’t bother me, no, no

So when I come home feeling tired and beat

I’ll go up where the air is fresh and sweet

I’ll get far away from the hustling crowd

And all the rat-race noise down in the street”

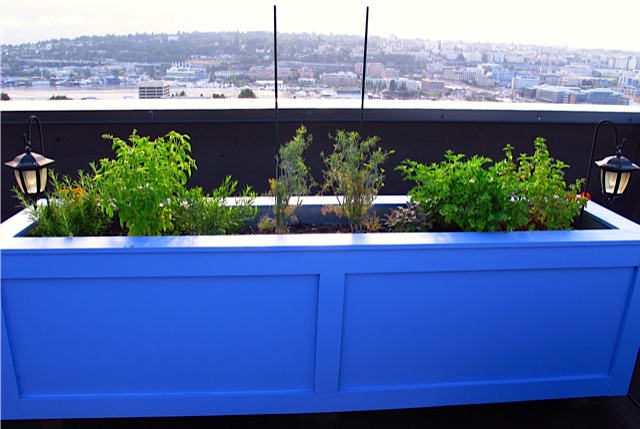
Up on MY roof, there is a large, open space and planter boxes brimming with plants surround the perimeter. Most of the boxes contain beautiful flowers – low maintenance of course as I’m hardly ever in town. One of the 7-foot by 16- inch planter boxes is filled with my herbs – along with a few marigolds to keep insects at bay. This year I finally planted the perfect mix of herbs for how I cook, and whenever I please I snip this and that: From left to right you’ll see Rosemary, Basil, French Tarragon, Dill, Sage, flat leaf parsley and mint. These seven plants are my holy grail of herbs that I use the most in the summer. Plus they continue to proliferate from June through most of September. Next year? I’m planting exactly the same starts.

Up on the roof….I keep humming that song by my buddy JT!

Share
Posted in uncategorized | Tagged | 1 Comment

Priscilla’s Marinated Peppers

Click here to view recipe.

Priscilla's Peppers with savory cheese on crostini

A plethora of colorful bell peppers mounded on tables caught my eye recently at my neighborhood market: 4 for $1. I adore working with colored peppers and use them in Pepperonata as a side dish, roasted with all kinds of meats, sautéed and added to grains and beans in a protein packed salad, blended into soups – the options are endless! Grilling the peppers to serve on top of rustic bruschetta came to mind just the other day and I decided to prepare this appetizer for dinner. I love slapping the seeded peppers, flattened by hand, on the grill or stovetop gas burner until they are charred – then removing them to a plastic bag for a few minutes and sliding off the charred peel. Into a light vinegar mix they go, and they stay in the refrigerator this way for a couple of weeks. Whenever I prepare peppers this way – I inevitably think of Priscilla – the woman who taught me this method.

Cilla and my dad, 1999

Priscilla, aka “Cousin Cilla,” is my cousin by marriage and is almost like a sister to me. She lives in Half Moon Bay, California and for years owned her own hair salon. Several years ago she began painting large murals and produces breathtaking watercolor and oil paintings on commission and to sell in galleries (click here to see her beautiful work). Cilla has a Southern drawl, and plays piano show tunes by ear. She cooks and entertains, and her recipes are tried and true. Whenever I visit she feeds me and inevitably I request the recipe she has prepared, be it an appetizer, a soup or a main dish. Her food not only tastes delicious, but she presents it like a piece of art, on beautiful plates with the perfect garnish. My kind of woman!

The Perfect Centerpiece

Last summer we drove to their house where she effortlessly prepared a colorful, decadent lunch for eight of us. While we were visiting we were presented with smoked marinated peppers atop crostini and soft goat cheese. YUMMMM. Cousin Michael meanwhile entertained my grandson with puppets and toys he keeps just for neighbor kids!

Michael and his Puppet

Kudos and hugs to Cousin Cilla for giving me this and many other recipes, and for cutting my hair and applying my makeup for countless family weddings and get-togethers. Double hats off to Cousin Michael for being a terrific person and for having the good sense to marry Priscilla to make her part of our family.

Marinated Roasted Peppers

pf-icon2

Ingredients:
  • 6 red, yellow, or orange peppers – all one color or a variety
  • ¼ cup plain white vinegar
  • ¼ cup unseasoned rice vinegar
  • ¼ cup granulated sugar
  • 1 tsp. salt
  • 1 Tbs. water
  • 1 tsp. olive oil
Instructions:

Cut the peppers in half and remove stems, seeds and inner membrane. Flatten each half with your hand and broil or grill with the smooth part of the pepper next to the flame until charred and blackened. (You can also broil the peppers or place them directly over the flame over the burner of a gas stove.) Once the skin is black, remove from the heat source and put the halved peppers into a zip lock or paper bag for 5 minutes, then remove them. Hold the pepper under running cold water; the skin should easily slide off. Cut the skinless peppers lengthwise into ¼ inch wide slivers -you can cut them widthwise into smaller segments too – I often cut them in half

Meanwhile, make the marinade by whisking all the remaining ingredients together.

Put the pepper slivers in the marinade for at least an hour. Keep refrigerated for up to 2 weeks. Drain and place a few pieces on small slices of toasted bread or crackers spread with goat cheese. I also use these marinated peppers as a condiment for sandwiches or simple goat cheese pizza

Share
Posted in Condiment | Tagged | Leave a comment

Frittata for Family

Click here to view recipe.

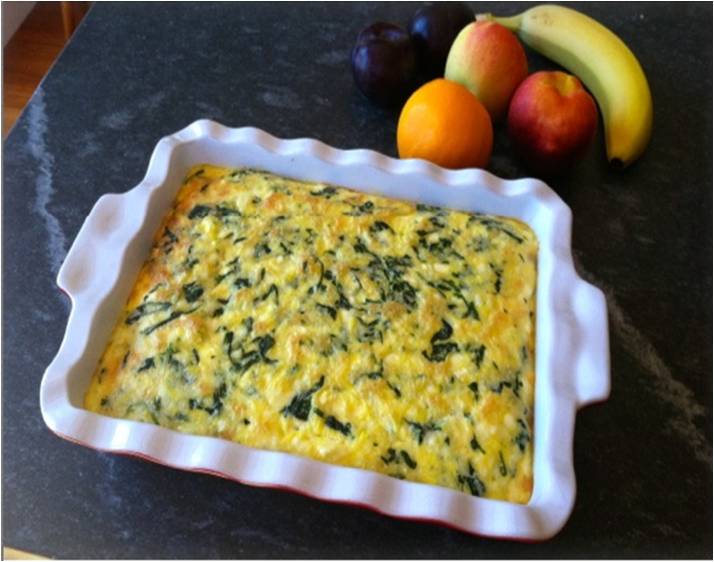
Frittata Fresh from the Oven

My son’s father-in-law recently passed away and the kids asked me to fly down to San Francisco to help with my grandchildren. “Help” to me translates into tending to everyone’s needs, entertaining the toddlers and, of course, cooking like a maniac while they nap.

Comfort food is the first thing that comes to mind when times are tough. I think of steaming dishes of luscious food straight out of the oven – the smells emanating through the house to elevate everyone’s mood. While I was at my son’s house, I decided a savory frittata would do the trick. This Spinach frittata is one thing I often make for family or friends; it is actually similar to a Sephardic Jewish Frittata – sort of a quasi-crustless quiche – although my rendition isn’t as traditional (hence the cottage cheese and nutmeg).

It is warm, eggy, salty yet gentle on the stomach. It’s also a dish beloved by kids and adults alike, and if you are motivated to make a double batch and bake two of these, they freeze well for up to three months. You can even combine all the ingredients (except spinach) the day before and refrigerate the uncooked raw mixture overnight. When you’re ready to bake, just bring it to room temperature and pour ingredients into the greased casserole and voila – freshly baked frittata!

This also serves as one of my “go to” brunch dishes for company and when I share the recipe, friends can’t believe how easy it is. It always receives rave reviews and, if we’re lucky, we have leftovers to reheat for an easy dinner.

Marilyn’s Frittata

Makes one 8 x 11 casserole or 8-10 servings

pf-icon2

Ingredients:
  • 9 eggs
  • 1 pint small curd cottage cheese (I use full fat)
  • 8 oz Swiss cheese, grated
  • 8 oz feta cheese, chopped
  • 1 pound of fresh baby Spinach, washed-or 1 lb frozen chopped spinach, thaw and squeeze dry
  • 1 pinch of fresh ground nutmeg
  • Olive oil to grease the baking pan on the bottom and sides
Instructions:

Begin by filling a large sauté or soup pot with two inches of water and bringing it to a boil. Add spinach and allow the leaves to wilt, about four minutes. Don’t put a lid on the pan but keep moving the spinach leaves around with a tongs. Remove the spinach to a strainer and keep pressing with the back of a spoon to remove as much water or liquid as you can. After it cools a bit, squeeze it with your hands to remove even more liquid, then roughly chop the spinach.

Once the spinach is prepared, beat eggs, add cheeses, and stir in spinach and nutmeg. Put into an oiled pan, and even out the surface. Bake about 45-50 minutes at 350 degrees until golden brown and “set” so that when you gently shake the pan, the center doesn’t appear to be runny. Allow the frittata to cool at least 10 minutes before cutting into squares.

I always serve this with a slice of fresh tomato or sautéed cherry tomatoes on top. I also like to accompany it with whole grain crackers or rustic bread, fresh fruit salad, and a vegetable or green salad… Delicious!!!

PS: I have used steamed chopped broccoli in place of spinach, cheddar cheese instead of Swiss – the sky is the limit. A little fresh Parmesan cheese on top doesn’t hurt either. Also – refrain from adding additional salt as there’s already a lot in the cheeses. Final note – I like my frittata fairly thick but it is also possible to bake this in a larger dish and have a “flatter” looking frittata that is still good. OK – just one more thing … frittata is good hot, warm or even room temperature.

Share
Posted in Breakfast | Tagged | 2 Comments

Consummate Chinese Chicken Salad

Click here to view recipe.

Colorful Chinese Chicken Salad

The popular dish Americans label with the name “Chinese Chicken Salad” has absolutely no ties to China and does not resemble the food found anywhere in the Far East. Because most Chinese Chicken salad dressing recipes include “traditional” Chinese ingredients (i.e. soy sauce, rice vinegar, ginger, and sesame seeds), I suppose I understand my countrymen’s insistence on the name. But when it comes to incorporating ingredients like ramen noodles or fried won ton wrappers (no thank you) or mandarin oranges (double no thank you) – I draw the line.

Regardless of my reservations about the title of this dish, I must admit that this salad is a “go to” item to have on hand for the summer – especially for large groups or visitors who tend to arrive without much notice. I have the greens, the peppers and such in one bag, the nuts and sesame seeds and herbs and chicken ready to go, the dressing pre made. And voila! It takes me exactly one minute to either pack a lunch or to serve this to anyone who drops by. Everything stays fresh as can be for five days or even longer, and those who have had this salad at my home rave about the unusual flavors.

Fresh Ingredients

It is pretty much a no brainer – not really “cooking” per se but toasting nuts and seeds, and preparing everything else in advance…chopping – lots of chopping. Whenever I roast or make rotisserie chicken on the BBQ, I do an extra bird so I can save it to shred for lunches. If  I am feeling very lazy or haven’t planned ahead, a store bought rotisserie chicken works too. Just remove the skin and take the meat off the bones. The carcass can always be used for stock that same week or frozen for items like risotto.

Note: Really anything fresh and seasonal could be added to this mix. The other night I added sliced fresh radishes, leftover roasted green beans, farmers market English cucumber batons, and some tiny cherry tomatoes from my rooftop garden. I put the salad ingredients in a 6-cup sealed container, poured some dressing in a repurposed bottle, stuck in a plastic fork and a few napkins and when noon rolled around I merely poured the dressing on top, sealed the container and shook the whole thing. Such a lunch!!

Handy Dandy Container for lunch

The recipe below originated from a friend of a friend and many changes have been made from my global kitchens.

Consummate Chinese Chicken Salad

Makes 10-12 large servings

pf-icon2

Ingredients for the dressing:
  • ½ cup sugar
  • ½ cup water
  • ½ cup seasoned rice vinegar
  • ½ cup tamari
  • 2 tsp. black pepper
  • 4 tsp. dry mustard
  • 1 ½ tsp. fresh ginger-peeled and grated on a microplane grater
  • 2 cloves garlic
  • 2 Tbsp. toasted sesame oil
  • ½ cup canola oil
Instructions:

Heat sugar and water until the sugar is dissolved, then add the rest of the ingredients and keep in a covered container in the refrigerator for up to 2 weeks. The salad has a kick to it from the mustard, pepper and ginger, so back off on these ingredients if you like milder flavors.

Ingredients for the salad:
  • 1 large head or two regular size heads of Napa cabbage, sliced 1/8 inch
  • 1 large head romaine, sliced the same as the cabbage
  • 3 julienned carrots, 1 ½ inch, done on a hand held peeler like you use for green papaya
  • 2 red peppers, cut into matchstick pieces 1 ½ inch by 1/8 inch
  • 1 yellow pepper, cut like the red one
  • 2 cups edamame beans, cooked (I buy them frozen and already shelled – just defrost them)
  • 4 cups snow peas, trimmed and cut into ½ inch pieces
  • 2 lb. shredded cooked chicken
  • ¾ cup chopped cilantro
  • ¾ cup mint leaves, chopped
  • 1 cup toasted sesame seeds
  • 1 cup toasted slivered almonds (I bake them at 350 for 3 minutes in the toaster)
  • Optional: sunflower or bean sprouts, sliced radishes, halved grape tomatoes or anything else you like

I keep all of this separate from the dressing with the lettuce/cabbage mixture in a huge bag, and another container with veggies etc. That way at the last minute you can make one or two servings of salad. OR you can make a huge bowl of this for company.

You can easily make half of this recipe if you wish.

Share
Posted in Salads & Dressings | Tagged | 4 Comments