Do The Math: Kitchen Calculations

My Favorite Measuring Devices

My Favorite Measuring Devices

Let me begin this post by admitting that math is, actually, my strong suit. As far back as I remember I always did much better with math and reasoning skills than language. And I’ve been  proud of  my keen ability to calculate – it sure comes in handy! I can quickly compute what “40% off” means or how many cups of broth I need when I multiply a recipe by four. Maybe I like math because it is black and white, things can be explained in concrete terms and there is always a “right” and a “wrong” answer.

That being said I do not judge anyone who isn’t proficient at mathematics. Everyone’s brain is different. That said, I do believe that learning some basic calculations can help immensely when it comes to cooking and baking. For example, there are three teaspoons in a tablespoon – so if you see a recipe written that asks for four teaspoons, you will know that you can measure one tablespoon + one teaspoon. If you triple four teaspoons, this is equivalent to four tablespoons. No need to one-by-one measure out twelve teaspoons! And yet, when I had my catering business, I’d see my workers measuring teaspoon by teaspoon 99 times out of 100!

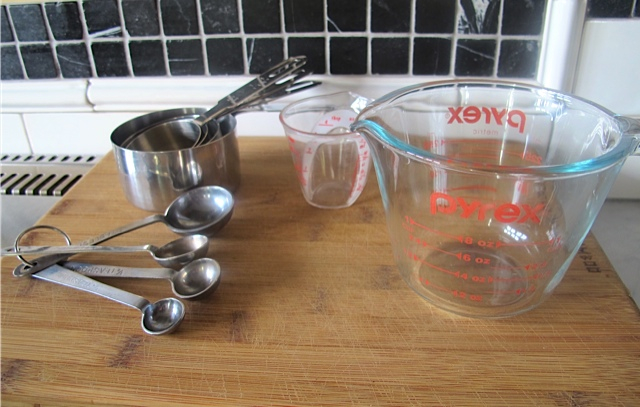
For those of you who can use a little extra help with kitchen calculations – here are some tools I use to measure (as pictured above):

Metal Measuring Cups

These are for dry ingredients like flour or sugar…NOT LIQUIDS people. Scoop stuff into the metal cup, level it off with a knife and voila! (background left)

Oxo  2 oz LIQUID Measuring Cup

This is my favorite little gadget, a tsp/tbsp LIQUID measuring cup with a lip. I use this one daily – especially when making salad dressings or crackers. It’s easy to see where two tablespoons will be (look at the meniscus of the liquid) and it saves me messing around with a teaspoon or tablespoon. Our supermarkets carry this little cup-it’s a 2 ounce size. (rear center)

Pyrex LIQUID Measuring Cup

This is my older-than-the-hills pyrex measuring cup for liquids such as oil, water, and the like. I actually have four versions of this glass measuring cup (1 cup, 2 cup, 4 cups and 8 cups) and I use them all. (right front)

Metal Measuring Spoons

Ta da, finally – my metal measuring spoons tablespoon, teaspoon and fractions thereof. (front left)

I really don’t like plastic cooking utensils and I use metal or glass whenever I can. Just one of my hangups – but to me they clean much more easily and don’t hold onto odors.

And here are the basic equivalents you should memorize or post somewhere until you learn them by heart:

3 teaspoons = 1 Tbsp = ½ ounce
1 cup = 8 ounces = 16 Tbsp (½ cup = 8 Tbsp)

Class dismissed!

Share
Posted in Kitchen Essentials | Tagged , , , | Leave a comment

New York Green Festival

The Green Festival!

The Green Festival!

It was 11 AM in New York City, April 27, 2014.  Where was I?  At the Green Festival on Pier 94, of course!

Huh?  I was in New York to meet my three sisters and our husbands, although half of the crew hadn’t yet arrived.  My sister Kay and I roughly mapped out our day for this particular Sunday, being sure to save major exhibits and events and even restaurants for when the entire gang was assembled.  And so it came to pass, in the land known as the Big Apple, that we attended the Green Festival, a huge event with products and services displayed to encourage “green” living.

Playing with my sister Kay

Playing with my sister Kay

As you can imagine, the massive convention- center like room loomed large – and we were greeted with green t-shirt-adorned 20 somethings.  People at the check in booth looked more like Seattleites than New Yorkers.

First up, the Green food displays.  Woah! Pretty much everything was labeled non-GMO, gluten free, locally sourced, non-dairy, vegan, vegetarian, sustainable, organic, eco friendly, no sugar added…with lots of samples of ice cream (sans dairy), energy bars (lots of dates and nuts), and countless flavored energy drinks.  Why did we bother to have breakfast anyway?

I bet you think I came for the food booths, but you are wrong.  I was just as interested in the whole enchilada – the beauty products, home products, and everything else.

The Soom Girls

The Soom Girls

Along the way we met Kay’s acquaintances from Washington, DC:  two of the three sisters who started Soom Foods.  Kay’s acquaintances from Washington DC, the founders of SOOM Foods.  Their products now include chocolate tahini and the packaging is fresh and  the font is now large enough for me to read with my old eyes.  If you haven’t yet tried this tahini, it is  available on Amazon.com and it’s so worth choosing this brand for many of the recipes I’ve posted (salad dressing, tahina sauce for meats, hummus, even cookies).

Adorable Three Birds Dish Cloths

Adorable Three Birds Dish Cloths

On to the green, eco friendly, non-food items, beauty products, packaging and cookware.  My personal favorite was Three Blue Birds. This small, Connecticut-based company displayed  the most adorable 100 percent biodegradable Swedish dishcloths.  Read all about them here.  The cloths I loved most were designed by Lasse, Lynda’s Finnish-born husband.   In chatting with them, I learned that Lasse is an engineer by day but loves to come home and draw designs for these dishcloths.  I purchased a dozen to give as hostess gifts, birthday gifts, you name it.

After a few hours, Kay and I stepped back out to the sunny New York weather and continued our day as tourists.  I loved our time together – it was one of those activities we hadn’t thought of doing until a couple of days before the festival.  My kind of travel for sure – I try not to be rigid with what I will do and like to fly by the seat of my pants to find pearls of adventure at times!


Share
Posted in North America | Tagged , , | 2 Comments

Asparagus … Again

Click here to view recipe.

Beautiful Asparagus

All winter long we ate root vegetables, or “dirt” vegetables, in huge quantities, and I truly love to buy and prepare winter legumes.  But in my world once I spy fresh asparagus in the markets, my brain sings SPRING!

I was “stuck” on repeat mode for a long while and prepared room temperature asparagus with a soy/sesame sauce that I still love, but I recently took a cooking class where I was inspired to make asparagus with fresh herbs and shallots.

The version I witnessed during the quick cooking demonstration was more French and involved oven roasting the spears of asparagus and topping them with a hand whisked sauce that resembled a salsa verde with sieved egg yolk and garlic.  This took much longer than my pared down formula.

I think my recipe is easy and really, really good.  I’m proud of myself for visualizing the garnish with not only a grated egg but with pickled onions as well.  Not only does this taste great but it’s a bit crunchy (think good texture) and pretty, too. I know I sound a little full of myself, but see what you think!

I am admittedly a fresh herb lover and feel I “hit the jackpot” with this recipe.  It graced our Passover table, and I’ve made this asparagus dish too many times to count.   I have every intention of repeating this preparation as long as the asparagus looks good this Spring.

Asparagus with Herbed Shallot Emulsion and Pickled Bermuda Onion

Serves 4-6

pf-icon2

Ingredients
  • 1 large bunch fairly thick asparagus (about 1 ¼  lb)
  • 1/3  cups chopped herbs – this time of year I use tarragon, dill and parsley in equal parts – but any combo of herbs you love is fine
  • ½ medium shallot, diced
  • 1 tsp lemon zest
  • 1/3 cup extra virgin olive oil (about 5 ⅓ Tbsp)
  • 1 hard boiled egg (grated for garnish)
  • 1 small red Bermuda onion (for garnish)
  • ½ cup seasoned rice wine vinegar (to marinate the onion)
  • Juice of 1 lemon  (right before serving)
Instructions

Snap off the ends of the asparagus spears.  Meanwhile bring a large saute pan with about a half an inch of water and two teaspoons table salt to a boil.  Add the spears and keep simmering.  Leave on medium heat for two minutes so it turns brighter green and is fairly firm when pierced with a fork.  Remove to an ice water bath and let sit for five minutes.  Dry thoroughly on a dishtowel, put in tupperware or paper towels until ready to continue.  (This can be done a day or two before you complete the recipe and serve it.)

Alternately, you can roast the asparagus by coating them with one tablespoon of olive oil on a parchment lined rimmed cookie sheet at 450 degree convection (475 regular heat) oven for 10-12 minutes until done to your liking.  Do not crowd or overlap the stalks or they steam rather than roast.

If you blanch or roast the asparagus ahead of time, then an hour or so before serving, remove the asparagus from the fridge to bring to room temperature.

Before making the herb emulsion, I prepare a lazy person’s pickled red onion to use as garnish and to give the finished dish some crunch. In a pint glass jar, I add about 1/3 cup of red onion rounds (slice thinly) then barely cover these with seasoned  rice wine vinegar.  Add a pinch of salt, put the lid on the jar and store it in the fridge – they will be ready after your asparagus is plated and ready to garnish!  Impressive and easy, no?  And there will be enough onions to use on sandwiches or other veggies for garnish.

To make the herb emulsion, put the chopped herbs, chopped shallot and lemon zest with the olive oil in a narrow tall container and use your immersion blender to puree it. The sauce should be thickish like a loose pesto.  You have to be able to toss this with the asparagus so too thick isn’t good.  If it looks like you need more, add additional olive oil.

If doing at the last minute then after the asparagus is cooked and still warm or even room temperature, toss with the herb emulsion (I don’t think you will need the entire amount but you could make even more asparagus if you don’t want leftover sauce).  Dress right before serving  and season with salt, lemon juice, and more olive oil.  Top with grated hard boiled egg whites or whole hard boiled egg.  Sprinkle with some pickled onion.

Share
Posted in Vegetables | Tagged | Leave a comment

Chayote (Cho Cho) Salad

Click here to view recipe.

Colorful Chayote Salad

Colorful Chayote Salad

When I am in Belize for long periods of time, as I often am, I inevitably crave vegetables.  For some reason, however, the typical local produce (carrots, tomatoes, onions and cabbage) just isn’t that interesting to me. And although the larger stores patronized by expats carry a greater variety – including squash, broccoli, cauliflower, lettuce and the like – these imported vegetables are very, very expensive and not all that fresh.

So in the interest of finding a new vegetable to savor, I decided to try Chayote (rhymes with Coyote, the animal) this week after listening to Gaylynn in my yoga class.  She had been scuba diving in the Turneffe Islands and the chef there served a wonderful chayote salad.  His “recipe” (I use quotes because most chefs don’t exactly hand out rare formulations) was to soak the thinly sliced and peeled vegetable in vinegar for seven hours, then add lots of cilantro and basil, and finally dress it with a balsamic vinegar, coconut oil and mustard emulsion. OK…

I suddenly flashed to the coleslaw salad dressing sitting on my pantry shelf, left over from the slaw we had last weekend.  I know this powerful mix is a sweet and tangy vinaigrette.  And I decided against balsamic vinegar because it’s not really Belizean and turns the finished salad a brownish color.   The coconut oil?  My husband doesn’t like the taste of it so I still have it for medicinal and cooking purposes but I don’t use it freely.  I wanted to keep  this  local and simple.

To be candid this was the first time I’ve used raw chayote.  In the past I put it in chicken soup where it became more translucent as it cooked and really had no flavor.  It’s been served to me in local restaurants steamed with zucchini, onion and carrots and I found it to be pretty nondescript.

Fresh Chayote

Fresh Chayote

Chayote (also callled cho cho) is ubiquitous in Central America and can be found at all the little pop-up tienditas here.  It looks very similar to a light yellowish-green pear with smooth skin (there are apparently prickly skinned varieties but I’ve never seen them) and belongs to the same family as melons, cucumber and squash.   The texture is exactly like an Asian pear – it feels identical when cutting through the flesh.

The raw chayote tasted moist, crispy and crunchy but bland and flavorless; in fact if I closed my eyes I’d have no idea what I was eating. OK…so I knew  it needed kind of an assertive dressing and some color in the salad as well.  Not too many ingredients to put chayote in the back seat but enough to bring it to life!

My family was visiting when I tried this salad and they all gave it a big thumbs up.  I’m happy to have ventured forth with a totally new creation – especially one that takes advantage of the local produce and is so refreshing for our hot days here in paradise!   The chayote in this salad is a little sweet but crisp and satisfying.

Chayote Salad

Serves 6

pf-icon2

Ingredients
  • 4 chayotes
  • ½ green  habanero
  • ¼ cup coleslaw salad dressing
  • 1 large carrot (diced ⅓ inch)
  • ¼ cup cilantro leaves (chopped)
Instructions

Cut the chayotes in half and peel, then remove the “pits” (like in a pear) with a spoon or knife.  Dice into ½ inch.  It is imperative to peel the chayote under running water or wear gloves and wipe off the flesh before dicing – there is a slimy substance just under the peel that will coat and dry out your fingers otherwise.  Trust me on this!  The peel is very thin and easy to remove with a potato peeler.

Slice up the habanero. If you thickly slice it, you’ll see it if it lands in your dish and then you won’t bite down on this hot pepper unless you choose to do so.  This amount of habanero isn’t that powerful anyway so add more if you like spicy food.

Let the cubed chayote and sliced habanero (including the seeds) marinate in the dressing, refrigerated,  for at least four hours, stirring it every hour or so.

Before serving add the carrots and cilantro.  The dressed salad keeps for three days in the refrigerator if you manage to keep from eating a lot of it.

Share
Posted in Central America, Salads & Dressings | Tagged , | Leave a comment

Celery Root Mash with Saffron Sauce

Click here to view recipe.

Celery Roots

Celery Roots

Sometimes I believe I should work for a supermarket and place myself in the vegetable section – giving tips and ideas to shoppers on how to prepare some of the lesser known veggies or even fruits. Just the other day I heard a woman ask the produce manager how to prepare celery root. He told her to peel it, cut it, and oven roast the cubes so the flavor wouldn’t be overwhelming. I couldn’t help myself – I interjected and told her how I mash celery root, what to serve with the final dish…and I then emailed her this recipe! Then I heard another gentleman ask about parsnips, but enough was enough and I kept shopping.

You know the adage “Make New Friends, But Keep the Old…” It’s like that with my recipes. I love to try new things, but I keep the old tried and true ones around as well. I’ve been saving recipes on my computer for over 15 years!! BUT I often forget about things I have made that are really good…so last year I started a folder called “Things I LOVE.” This simple addition helps me when I am in the mood for a tried and true dish and I am out of ideas.

My son was visiting his aunt (my Sister Sue) in Santa Cruz a few months ago and she made a marvelous dinner for him… and he was especially excited about the celery root! I often use celery root in the winter but I usually just cube it, steam it and add a bit of lemon juice and olive oil. It’s really good, but the silky smooth potato-like texture of Susan’s mash my son raved about really appealed to me. I called and asked her what the heck she did to make the puree.

Celery Root Mash with Saffron Sauce

Celery Root Mash with Saffron Sauce

Turns out this recipe she made came from a class we sisters had taken at The Inn at Meander Plantation in 2007!  Classic…I just forgot about it. This week I made the celery root using milk in place of cream and the flavor and texture of the puree was heavenly. Two of us consumed over half of this recipe, which is supposed to feed 5-6 people. I served it with some roasted fish and a warm salad made with kale and rainbow carrots.

Celery Root Mash

Serves 5-6

pf-icon2


Ingredients
  • 3 large celery roots, peeled and diced ½ inch
  • 3 garlic cloves, peeled
  • A mixture of one cup of water and one cup of milk (I had 2 % milk) to cover the celery root cubes
  • 3 Tbsp butter or good olive oil
  • ½ tsp salt + more to taste after it is cooked
  • Ground white pepper to taste (black pepper wouldn’t look as pretty)
Instructions

Put peeled and cubed celery root and garlic into a 3-quart sauce pan. Barely cover the cubes with water/milk and bring to a gentle simmer. (BE CAREFUL!! For some reason this always boils over on my stove and I end up doing a lot of swearing and cleaning.) Add a half a teaspoon salt and cover, keeping at a low simmer for 25-30 minutes or until the celery root is very, very soft. Pour the contents of the pot into a strainer.

Place the still warm, cooked cubes of celery root and garlic into a food processor and puree with the butter or oil, scraping down the sides. The mix should be perfectly smooth. like airy mashed potatoes. Add more salt and white ground pepper to taste.

Use in place of mashed potatoes and serve with fish, chicken, or a main dish like Portobello mushrooms.

And If I need color on the plate – and I usually want lots of color – I drizzle each serving of mash with this Saffron reduction.

Barcelona cooking school

At the Cook and Taste Cooking school in Barcelona, Spain where I learned about Saffron.

Saffron Sauce

Ingredients
  • ¼ cup white wine vinegar
  • 1 tsp. saffron threads
  • 2 Tbsp olive oil
  • Sea salt & white pepper to taste
Instructions

Pour vinegar into a small sauce pan, stir in saffron and cook over very low heat until the vinegar is reduced by half – to about two tablespoons. Let it cool for five minutes, then whisk in two tablespoons of olive oil. Season with ¼-½ tsp fine sea salt and white pepper.

Drizzle lightly over mashed celery root, mashed cauliflower or even mashed potatoes to give it color. I also use this over seared halibut or any white fish that needs a shot of the unusual.

Share
Posted in Vegetables | Tagged , , | Leave a comment

Homemade Gefilte Fish

Click here to view recipe.

Delicious Gefilte Fish

Delicious Gefilte Fish

In my family, just saying “homemade gefilte fish” causes us to salivate. Food memory, for sure. Any man, woman or child who makes homemade gefilte fish will swear theirs is the best. And the variations on this Jewish delicacy abound: some add sugar (Polish) and some use Salmon, heaven forbid (sorry my Pacific Northwest friends). In my Midwestern-upbringing opinion, however, the best recipe incorporates Walleye and Northern pike. But since I live in Seattle I use all white fish, some with fat and some without.

An array of fish

An array of fish

Making gefilte fish evokes memories of Jewish holidays. My mom used a very different method and put the fish and stock into a roasting pan in the oven. I don’t recall that her fish was one of her better dishes. Thankfully, my Bubbie-in-law made the very best, gold standard fish and I remember taking copious notes while she ground the fish by hand, her long braids wrapped up in a head scarf. My sister- in- law Nancy would alternate years with me, and she had a good set up with an extra stove in her garage. Every year, the two of us would critique the fish without mercy and, sadly, we just couldn’t get it to taste as good as Bubbie’s.

Nancy passed away over 10 years ago so I am the only gefilte fish maker in my family. Each year my mixture varies a bit since Passover falls at various times, usually in April. This year trout, dover sole and cod were recommended and it was one of my top batches for sure! Having my special fishmongers Kenny and Big Mike at Uwajamaya is the key. They grind the fish and save the bones, heads and the like for my fish stock. In addition to the delicious fish, they handed over rockfish heads and halibut bones and skin.

Fish heads!

Fish heads!

Before you start, open all the windows in your kitchen, and close doors to the areas where you don’t want the smell of fish to emanate. Put on the exhaust fan over your large pot. Change into a ratty old tee shirt (mine is purple and says “Iowa” ) and know that when you are finished, you will need to go straight to the shower with a bar of soap and shampoo and scrub every inch of your body.

Gefilte Fish

Yields around 23-25 large fish balls, about 4.5 oz each.

pf-icon2


Fish Stock Ingredients
  • 5 lbs white fish heads, bones, skin
  • 3 large carrots, cut into 2 inch sections
  • 3 large celery, cut into 2 inch sections
  • 2 large brown skinned onions, quartered (keep the peel on for color)
  • 4 large sprigs of fresh parsley
  • 2 Tbsp sea salt
  • 1 tsp peppercorns
  • 5-6 quarts water or enough to barely cover the above
Instructions

Put all the stock ingredients in an 8 quart pressure cooker for 20 minutes at full pressure. Remove the pressure cooker from the stove and place under cold running water to lower pressure quickly. Strain liquid through a chinoise into the largest pot you have (at least 8 quart). Discard all solids. If you don’t have a pressure cooker, just simmer the stock for an hour in a huge pot and strain. Note – you can do this a day prior to making the fish balls.

Add 6 fresh peeled and cut up carrots and more fresh parsley to this liquid and bring to a simmer while you are forming the balls

Fish Ball Ingredients
  • 1 ⅔ lb ground trout
  • 2 lb ground dover sole
  • 2 ¼ lbs true cod ground
  • 4 eggs – beat with whisk
  • 1 1/3 large brown skinned peeled and chopped onion – finely chopped 1/4 inch or so
  • ½ cup matzo meal
  • ¾ tsp ground white pepper
  • 1 ½ Tbsp sea salt
  • ¼-½ cup lukewarm water (add more if needed – do it slowly so not too much)
Instructions

Use your huge stainless steel bowl to mix the above ingredients together. Adjust the consistency and taste as needed so that you can still form balls with wet hands, but the mixture should be moist and not at all stiff. Let the mixture sit on the counter for about 15 minutes before forming the balls. Use wet hands to form balls that are oval, smooth and around 4 – 4.5 ounces each.

Forming fish balls by hand

Forming fish balls by hand

Slip the balls gently into the simmering stock. If your pot isn’t large enough, divide the broth between two stock pots. I happen to have a huge pot that is perfect for this amount of fish.

Don’t crowd the pots! Bring to a low boil, cover pot and lower the heat. Cover and simmer on low for 45 minutes. Every 15 minutes or so I shake the pot and baste the balls so they are moist. At 45 minutes remove the pot lid and reduce heat even more.

I take a slotted spoon and take out the fish balls to a rimmed dish but continue to simmer the stock for one hour until it is golden, reduced and concentrated.

Once cooked, store the cooled fish balls with liquid half way up the sides of your container. Refrigerate and serve cold with hot horseradish.

This will keep in the refrigerator for 4-5 days. This year I saved the stock and I plan to make a smaller quantity of fish in the next month or so, and I’ll also use some of the fish stock for a nice fish-based vegetable soup.

Note: In the past I have used different mixtures of fish:

2009:
1 ½ lb rockfish
1 ½ lb dover sole
2.8 lbs rainbow trout

2012
1 ½ lb trout
1 ½ lb petrale sole
1 lb red snapper

Share
Posted in Fish & Seafood | Tagged , | 2 Comments

Reuben Pizza Revolution!

Click here to view recipe.

Reuben Pizza - Ready to Eat!

Reuben Pizza – Ready to Eat!

I find food inspiration everywhere. Sometimes I try new recipes from cookbooks that I own (think Jerusalem or Silver Palate). Often I sample a dish at a restaurant then hurry home to recreate it as best I can. My family and friends email me recipes they like and want to share. Or I might pick up a magazine while getting my haircut and find gorgeous pictures of tempting food I immediately want to try.

From time to time, however, I find myself creating recipes with no discernable inspiration … aside from my imagination. For no reason at all, I recently came up with the idea of constructing a pizza based on a Reuben sandwich — you know, corned beef, sauerkraut, swiss cheese, thousand island dressing, mustard, rye bread… I LOVE Reuben sandwiches but I rarely have them – I’m picky and will only order them at great places such as Zingerman’s in Ann Arbor, Michigan or a top notch deli. And they’re not exactly en vogue …definately forbidden for those who are gluten free, dairy free, paleo, low cal or kosher — no siree!  I have no food restriction in my life, but I eat a Reuben only once or twice a year.

I recently had a hankering to make homemade pizza. Nothing atypical about that, right? What I find a little bit embarrassing to admit – I pictured topping the pizza with all the ingredients for the sandwich plus using caraway seeds. Embarrassing because WHEN THE THOUGHT OCCURRED TO ME, I WAS MIDWAY THROUGH A YOGA CLASS. So much for being in the moment and focussing on my breath. I was focussed on what I could eat that night. And it just so happened that I had recently made a small corned beef right after St. Patrick’s Day. It was sliced and ready to go but the thought of just plain old corned beef with all the fixings or corned beef sandwiches didn’t sound that great. And corned beef on top of greens, grains or just salad? No thank you!

Anyway, I hopped in the car and jotted this down on the way home. With my own corned beef, how far off could I be? Later on, ut of curiosity, I googled Reuben pizza to discover, alas, that there really is nothing new out there – just recreations and tweaking of basic concepts. That being said, I love the version I made, which was honestly exactly what I wanted and crafted from my head before I did a Google search!!

A Delicious Slice

A Delicious Slice

Reuben Pizza

Makes one average (12-14 inch) pizza

pf-icon2


 Crust Ingredients:
  • 1/2 cup warm water (110 F – 115 F)
  • 1 ½ tsp honey
  • 1 teaspoon active dry yeast such as Red Star
  • 1 1/2 cups bread flour (Gold Medal Better for Bread is fine)
  • 1 1/2 tablespoons olive oil
  • 3/4 teaspoons sea salt
  • 1 ½ teaspoons whole caraway seeds to top the dough
Instructions

In a medium bowl, mix warm water and honey with a whisk and sprinkle yeast over the top; stir to dissolve. Let this stand five minutes until the liquid bubbles. Add oil, salt and finally one cup of the flour. Stir in as much flour as it takes to form a ball, then turn out onto a floured counter and knead for five minutes – adding flour as needed to keep the dough from sticking to the counter. Put this ball of dough into a clean oiled bowl. Cover the bowl with a dish towel and allow the dough to rise in a warm, draft-free area until doubled in volume (about one hour). 15 minutes before the hour is up, preheat your oven to 425 degrees.

Knead the dough for a couple of minutes, then cover it with a towel and let it rest for five minutes. This makes it easier to roll out. I start with a rolling pin and after a bit I push the dough into a 12-14 inch round circle, which is a little on the thick side. Place the pizza onto a well oiled pizza pan and sprinkle the top of the pizza with the caraway seeds. Press the seeds into the dough with your hands. Place the pan into the center of the oven until slightly brown (about nine minutes). When you take out the crust, reduce the oven to 350.

Caraway Crust

Caraway Crust

Meanwhile, get the rest of your topping ingredients ready: (I put this on in the following order:

Topping Ingredients
  • ⅓ cup Thousand Island salad dressing (I make mine but you can buy it too).
  • 10 oz strips of corned beef (I used homemade but high quality deli meat is OK)
  • 1 ½ cups (¾ lb) good sauerkraut (I bought this in the refrigerated section of my supermarket)
  • 8 oz shredded Jarlsberg Swiss cheese (you will see from the pictures I used slices but next time I’m doing shredded so it melts better)
  • 1 ½ Tbsp extra olive oil to drizzle on top
Instructions

I make the pizza just the way I like my reuben sandwiches: a skim of thousand island dressing, a lot of corned beef, a fair amount of sauerkraut, and a layer of melted swiss cheese – but not so much cheese that it overpowers the meat.

Once the toppings are layered, I bake the pizza at 350 for an additional 5-10 minutes until the cheese is really melted.

When the pizza is out of the oven, rest it for five minutes then slide the pizza onto a cutting board and cut into wedges, I serve it with a squeeze bottle of yellow mustard, fancy deli mustard, halves of dill pickles and creamy cole slaw. If you close your eyes, you’ll know you are eating a reuben…pizza.

Sooooooo good and fun to make.

Share
Posted in Breads, Odds & Ends | Tagged , , | Leave a comment

Amazing Jerusalem Artichokes

Click here to view recipe.

Roasted Jerusalem Artichokes - Ready to Eat!

Roasted Jerusalem Artichokes – Ready to Eat!

I almost forgot about Jerusalem Artichokes this year – but thankfully bag after bag of these funny looking vegetables were piled on several stands at the Sunday farmer’s market here in Seattle.  And these little tubers were so cute and inexpensive that I just couldn’t help myself.

Hard to Pass Up!

Hard to Pass Up!

I actually investigated and potatoes and sunchokes have the same number of calories and starch but sunchokes have a lot more iron.   A native of the sunflower family (hence the name sunchokes), they have kind of a nutty, sweet flavor and are a fun vegetable that can add some much needed variety on your winter menu.

This is one of my favorite ways to prepare them…sorry I didn’t snap a picture with a poached egg!  Next time for sure…

Roasted Jerusalem Artichokes

Yields four healthy portions

pf-icon2


Ingredients
  • 1 lb Jerusalem Artichokes
  • ¼ cup olive oil
  • 1 Tbsp anaheim chili, diced ¼ inch
  • 2 Tbsp yellow sweet pepper, finely chopped
  • 1 Tbsp shallots, finely diced
  • ½ tsp sea salt
  • ¼ tsp fresh cracked pepper
  • ½ large lemon, zested and juiced-keep the zest and juice separate
  • 4 poached eggs for serving time(optional)
Instructions

Preheat oven to 400 degrees and place the rack in the center.  Scrub and cut sunchokes crosswise into ½ inch pieces and put in a large bowl.

Heat ¼ cup olive oil in a small saute pan on medium.  When oil is hot, add the shallots and pepper and cook gently for three minutes.  Pour the peppers/shallot/olive oil mix over the sunchokes.  Spread into one layer on a rimmed cookie sheet (I did this in my toaster oven) and bake for 35 minutes or until the sunchokes are soft when poked with a knife, much like a baked potato.  Remove from the oven and squeeze the juice of ½ lemon over the entire mixture, stirring around.  Return to the oven for 10-15 minutes.  Stir in lemon zest as it comes out of the oven.

Put each serving in a shallow soup bowl and top with a poached egg.   The poached egg can be mixed through to coat the sunchokes with the gooey egg yolk and soft egg white right before digging in!! Believe it or not, I eat this for breakfast or as a light dinner followed by a fresh vegetable salad.

Share
Posted in Vegetables | Tagged , | Leave a comment

Lazy Day Turkey Thighs

Click here to view recipe.

Turkey Thighs - Fresh Out of the (Toaster) Oven

Turkey Thighs – Fresh Out of the (Toaster) Oven

On days when you are not inspired to be creative but want something delicious, filling and easy – consider turkey thighs! I’m especially fond of them because you can roast them in the toaster oven or in your standard oven – easy peasy.  And you know how pork belly and bacon are foods du jour?  I predict that turkey wings, turkey thighs and chicken fat will soon be on every menu!  You saw it here first, folks!

Succulent Turkey Thigh Meat

Succulent Turkey Thigh Meat

Lazy Day Turkey Thighs

Makes 3-4 servings

pf-icon2

Ingredients
  • 1 medium yellow onion, peeled and thinly sliced
  • ½ red or yellow pepper, thinly sliced
  • 1 Tbsp olive oil
  • 2 large turkey thighs (~1 ¼ lb each)*
  • 4 tsp spice rub
  • ½ cup chicken broth (does not need to be homemade)

*Turkey thighs at my upscale supermarket cost $2.99/lb and each weighed about 1.25 lbs; $7 can easily feed four! You can easily double or triple this recipe as needed.

Instructions

Preheat toaster oven or regular oven to 425.  Line rimmed baking tray for the toaster oven or regular oven  with heavy aluminum foil.  Place onion and pepper slices on the bottom of the tray.  Dry the turkey thighs with paper towels, trim any excess fat and place them skin side up on top of the vegetables. Rub the skin of the turkey with olive oil and pat in the spice rub to coat the top of the skin.

Roast uncovered 30 minutes, then lower the oven temperature to 325 and continue baking another 40-45 minutes or until the meat is really soft and the skin is crisp and dark.    Remove the turkey thighs and let them rest at least 10 minutes before tearing the meat from the bone (I do this wearing disposable gloves, and I save the bones to make stock).  After removing turkey from the pan, set a skillet on the stovetop over medium heat.  Add whatever is remaining on the bottom of the bake sheet to the skillet along with the broth and simmer until slightly thickened.  Remove turkey skin (or not – in our house we eat the crispy skin) and carve turkey meat.  Spoon onions and sauce over the top and serve with mashed garnet yams and oven roasted green beans with walnuts.

Note: When I turn the oven down after the first 30 minutes, I add halved small carrots and halved brussels sprouts to the sheet, drizzled with olive oil, salt and pepper.  This is also great served with brown rice studded with dried cherries.


Share
Posted in Poultry | Tagged | Leave a comment

Belizean Black Beans

Click here to view recipe.

Beautiful Bowl of Beans!

Beautiful Bowl of Beans!

Black beans are probably my favorite treat when I am in Belize…and my husband makes the very best ones I’ve eaten, hands down. They are so creamy and filling and hearty that we have been known to have a large soup bowl of stewed beans with shaved cheese and condiment on top for dinner! It’s a perfect meal. And during my most recent visit, my two and four year old grandkids really loved these beans and gobbled them up for breakfast, lunch and dinner. Who knew?

This formulation came from various people: A Mayan woman in Punta Gorda, who made these beans over a fire in a cast iron pot, told us about using Culantro (wild cilantro) to flavor the beans. I could write pages about Culantro! Sadly, it is hard to find in supermarkets even here in Belize but I’m usually able to find some at Big Tree Produce. It resembles dandelions without the flowers.

Fresh Culantro

Fresh Culantro

The idea of including baking soda was mine, a concept from the Jerusalem cookbook. I’m not sure of the chemical reaction here, but the addition of baking soda helps break down the skins of the beans and make them ever so soft. The vegetables used from the onset almost make a vegetable like stock that infuses savory flavors into the beans and makes them taste more like a stew.

If you really believe that canned beans taste the same as cooking them yourself, I dare you to try these. You’ll never go back!! In order to get Wayne to share his recipe, I  had to divulge a couple of my own“secret” recipes including how to make homemade corn tortillas and salad dressing. But I was finally able to pry it out of him and am happy to share it here!

Belizean Black Beans

Yields 16 cups

pf-icon2


Ingredients
  • 2 lbs black beans
  • 1 large peeled white onion, diced ½ inch
  • 1 small head garlic cloves, peeled and minced (at home I will use 8 cloves since the heads of garlic there are larger)
  • 1 whole medium tomato
  • 1 whole scrubbed but unpeeled large carrot
  • 1 Tbsp sea salt
  • 1 tsp ground black pepper
  • 1 teaspoon Season All
  • 2 scant tsp baking powder
  • Two bunches culancho or cilantro, cleaned and roots removed – bruise by twisting the leaves with your hands (divide into two bunches).
Instructions

Clean the beans well to remove stones and dirt then rinse them with fresh water in a colander. Place in a large pot and add cold water to cover the beans by 2 ½ inches.

Soak cleaned and rinsed beans overnight at room temperature or for at least 10 hours. Drain thoroughly and add fresh water to cover the beans by 2 ½ inches in a large soup pot (6-8 quart) and bring to a boil. We don’t skim the grey gunk that rises to the top but rather stir it in. My wanna-be-chef husband insists the foam adds nutrients (!).

Reduce heat to a medium boil. Add the remaining ingredients (reserving one bunch of culantro) to the pot once the beans are boiling.

Once the vegetables and seasonings are added, reduce heat to a medium boil and mostly cover the pot for 1/2 hour (I leave a tiny bit uncovered so the steam can escape), stir and then completely remove the lid and continue on medium heat for 30 minutes to an hour until the beans are pretty soft.

With your tongs, fish out the carrot, tomato, culantro or cilantro and add the remaining bunch of fresh culantro along with two or three teaspoons of salt.

Continue cooking with the lid off on medium heat until the beans are much softer, about another half hour . The water should still be one inch above the beans, so add more water if you need to. Taste and season to your liking. Remove culantro or cilantro when done.

Let the beans cool for another 1-2 hrs in the juice, then put half in the freezer with the juice and half in the fridge to eat for breakfast, lunch and dinner! These will last five days in the refrigerator. The bean juice thickens by the next day.

Serve with grated hard cheese (Edam or Parmesan) on top and condiment (link) or chopped tomato.

Notes: If you are serving this to people who dislike cilantro, omit the Culantro or cilantro. In Seattle I substitute bunches of cilantro for the culantro since cilantro is much easier to procure. Also, the black beans here in Belize are fresh and tiny and cook quickly, so it might take longer to get packaged black beans to soften. Just keep tasting! You can also use these drained beans in salads or omelets, or blend them for refried beans.

Share
Posted in Central America, Side Dish | Tagged , , | 2 Comments