A Veritable Rainbow of Broccoli, Parsnips, Carrots & Celery Root
The other night I had plans to go to a 7:00 PM play with a friend, and we planned to grab a quick, inexpensive dinner nearby so that we could be at the ticket counter will-call right on time. For some reason, at the last minute going “out” to dinner didn’t appeal to me; I’d eaten in restaurants a couple of times during the week and wasn’t excited about any kind of food except my own. Crazy, no?
I proposed that my girlfriend come to my kitchen for a simple meal featuring previously served pot roast with some side dishes that would be quick to put together. She initially protested, crowing on and on about how she didn’t want me to do any work and she wanted us to have a leisurely dinner. After I calmed her down, I explained that for me, making dinner – particularly for the rare friend who doesn’t have food restrictions or issues – is a pleasure.
I looked through my refrigerator. The farmer’s market I religiously attend happens on Sundays, and I still had quite a bit of winter produce from the previous week. So this is what I did:
I filled a three-quart saucepan about 4 inches with salted water and brought it to a boil.
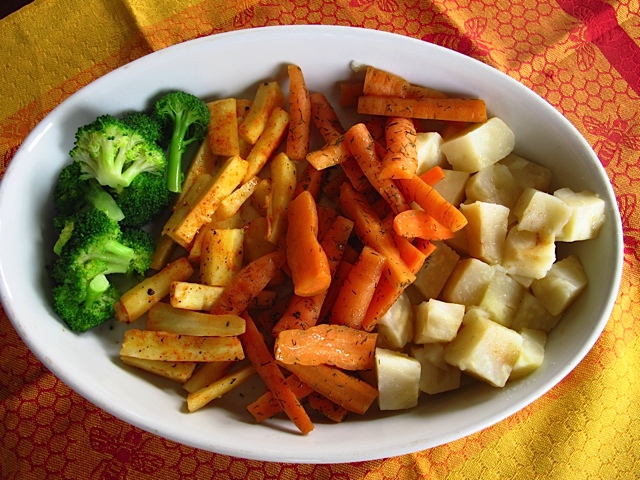
I peeled and cubed some celery root — my absolutely favorite — and added the pieces to the pot, covered, until tender when pierced with a knife, then removed them with a slotted spoon and tossed them in good olive oil and fresh lime juice (lime instead of lemon as I had half a lime rolling around the vegetable drawer).
Using the same water, in went peeled and cut parsnips (about ¼ inch by 2-inch matchstick pieces). I covered the pot again and cooked them until barely tender. Out they came with the slotted spoon and this vegetable was tossed with about 1 teaspoon of butter and smoked paprika.
I turned back to my simmering pot of water to steam fresh organic, unpeeled carrots – they were “ugly carrots”, pieces about two inches-knotty and asymmetrical. After they were al dente I combined them with hazelnut oil and dried dill.
And finally into the water went some broccoli flowerettes, not too much but what I had on hand. These were briefly steamed and kept simple with a touch of oil, salt and pepper.
After I was done, I sipped the veggie water!
The platter you see was almost polished off by the two of us along with reheated slices of pot roast in it’s au naturale gravy. And we started the meal with winter greens (a bunch of arugula, dandelion greens and baby kale) mixed with avocado slices, fresh orange slices , chopped pistachio nuts and toasted sesame seeds. I dressed this with an fresh orange juice, honey-sweetened vinaigrette.
We both loved our home cooked fare and had extra time to catch up with our lives. Start to finish I spent less than twenty minutes making our meal! And doesn’t the veggie platter look pretty?? My friend had never tasted parsnips or celery root, ever and really enjoyed these two new vegetables!