Click here to view recipe.
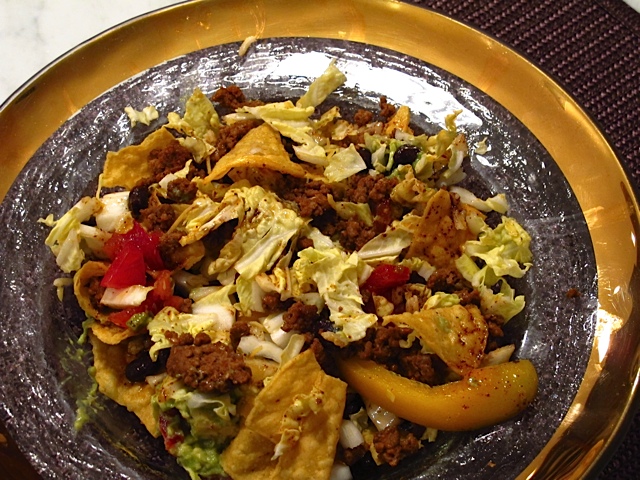
Tantalizing Taco Salad!
Summer is long gone and with it my craving for Chinese Chicken Salad. Winter, for me, is all about warming soups, greens and hearty grains. You might be surprised, however, to learn that Taco Salad is high on my list of favorite wintertime meals. I know, I know … steaming or sautéing greens is the way to go this time of year, but with beans, brown rice, warming spices…I feel like this is a legitimate lunch or dinner. Plus, it packs super well in a Tupperware container for the airplane if you have a long flight.
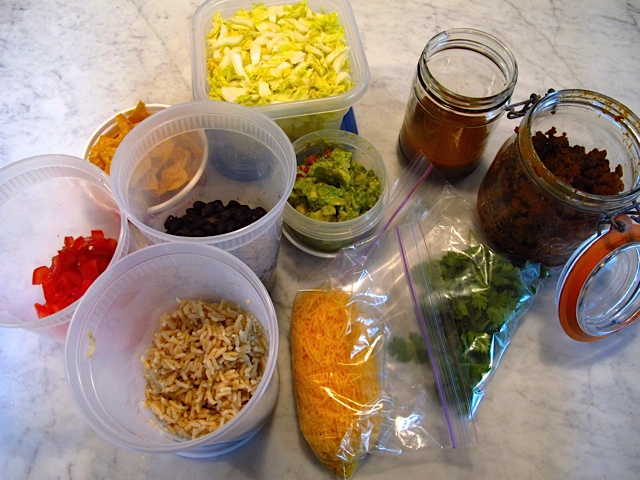
I keep the cabbage in a gallon zip lock then have little Tupperware containers or jars or bags of mashed avocado, seasoned ground beef, tomatoes wedges, cilantro, grated cheddar, rinsed black beans, cooked brown rice or quinoa, corn and salsa. I have corn chips in a drawer to crumble on top. I pack a large Tupperware of this on the go with dressing (it doesn’t take much!) and chips on the side and then shake it up right before eating. Feel free to substitute according to what you like on your tacos or burritos.
The only hard part of this salad is chopping up the vegetables. Don’t fool yourself….the dressing really makes this salad sing!
Salad Ingredients
Taco Salad
Makes 4 large or 6 medium-sized salads
![]()
Salad Ingredients:
(Keep each item in a separate container for easy assembly later)
- 1 lb lean ground beef sautéed with taco seasoning. You can use taco seasoning in a package or use the recipe below*
- 1 Avocado, mashed with a little lemon juice, salt, chopped tomato and hot sauce
- 3 Tomatoes – cut in ⅛ wedges
- ½ cup Cilantro – chopped
- 1 cup grated Cheddar Cheese
- Napa cabbage mixed with 3-4 diced carrots and 2 sliced yellow or red peppers
- 1 ½ cups cooked black beans (canned is fine, just rinse)
- 1 cup cooked brown rice
- Sweet corn cut off the cob (enough to get 1 cup of kernels)
- Pico de gallo or good salsa (think refrigerator part of the deli)
- Sour cream or plain Greek yogurt
- 1 cup tortilla chips (crumble in at the end)
Dressing Ingredients:
- ¼ c lime juice
- ½ c extra virgin olive oil
- 1 tsp sugar (I add a drop more)
- 1 Tbsp chili powder
- ¼ tsp ground cumin
- salt/pepper to taste
*Taco Seasoning Ingredients
- 1 tablespoon chili powder
- 1/4 teaspoon garlic powder
- 1/4 teaspoon onion powder
- 1/4 teaspoon crushed red pepper flakes
- 1/4 teaspoon dried oregano
- 1/2 teaspoon paprika
- 1 1/2 teaspoons ground cumin
- 1 teaspoon sea salt
- 1 teaspoon black pepper
Note: I only use corn in the summertime with this salad. And my tomatoes aren’t bad since they are vine ripened compari tomatoes.
I also make a “burrito bowl” with these ingredients by layering brown rice, beans, tomato, meat, avocado, cheese and cilantro. I just squeeze lime juice on top.
You could stir fry some chicken tenders and season them with taco seasoning just to switch it up a bit.