Click here to view recipe.
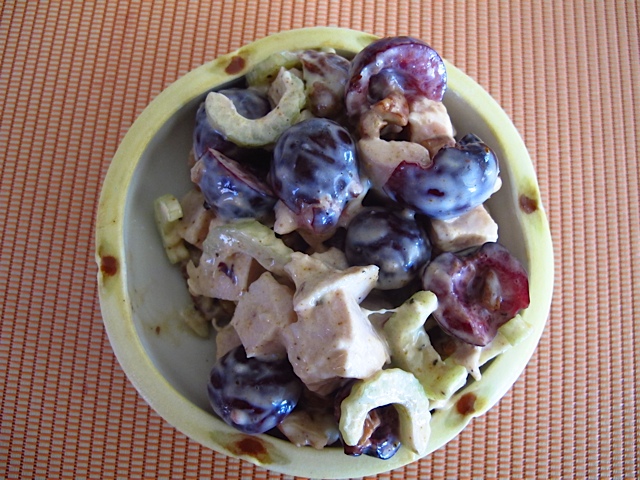
Creamy Curry Chicken Salad
I often rename my recipes once I rework them and make them more to my taste. I don’t even recall the original name of this recipe – but for as long as I can remember, my favorite chicken salad has always been known as “Daniel’s Chicken Salad.” Daniel (known to his friends as “Dan” but always Daniel to me) is my middle child, (now 33 years old) and has loved this for as long as I can remember. It’s straightforward, heavy on protein, and has a sweet component that complements the savory chicken. Of course, our family loves curry so this fits perfectly.
I usually make this recipe with halved red or green grapes, especially during the winter, but the other night I had some beautiful red cherries from the farmers market. Badda bing, badda boom. Oh, and leftover homemade mayo from last week’s post. I also own a handy dandy cherry pitter that I use to quickly remove the pits from the cherries, kind of like a hole punch you use for paper. WARNING: I once cracked a tooth with a cherry pit, so be careful here to make sure all the cherries are minus the pits after you halve them.
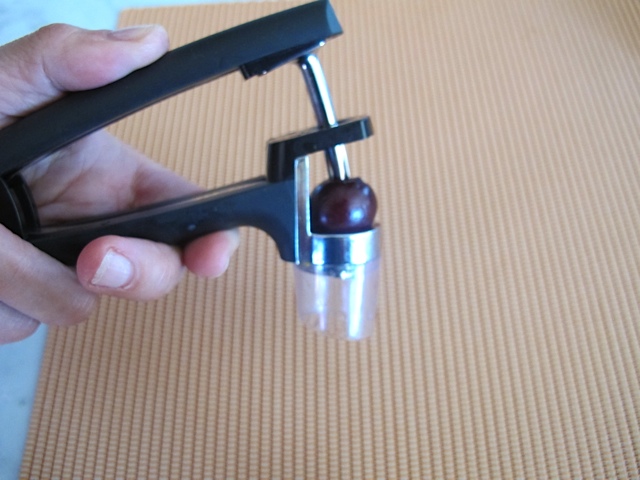
My beloved cherry pitter
On Sundays I often roast chicken breasts (bone-in and with the skin on … much more flavor and moisture) in my toaster oven. After it is barely cooled, I skin them (and let’s face it, I eat a teeny bit of the crispy skin!) remove the bones and then it’s ready to be cubed or shredded for salad, or sliced into a sandwich or pasta dish. For the two of us, I do four large chicken breast halves – and I share the fresh roasted chicken with company if need be. The bones are usually combined with veggies and water to make chicken stock!
The rest of this recipe comes together in a heartbeat. Make the mayo (link to mayo recipe) or use Best Foods mayo if you choose. This keeps in the fridge for at least five days. SO easy and yummy, any time of the year!
Daniel’s Chicken Salad
![]()
Chicken Ingredients:
- 4 split chicken breasts (bone-in, skin-on)
- Extra virgin olive oil to brush on top
- 1 tsp Sea salt
- Freshly ground black pepper
- 1 tsp smoked or regular paprika
Chicken Instructions:
Preheat oven to 425 degrees. Place the chicken breasts on a foil-lined, rimmed pan and rub with the skin with olive oil. Sprinkle liberally with salt , pepper and paprika.
Roast for 35 to 40 minutes, until the chicken is just cooked. When cool enough to handle, take the meat and skin off of the bones, discard the skin, and shred the chicken in large bite-sized pieces or slice or cube it. Use two of the breasts for this salad and the rest of the chicken meat can be cooled and covered, then refrigerated for another use. Or you can leave two of the breast halves that are roasted intact and serve them-bones, skin and all-for dinner!
Salad Ingredients
- 1 lb chicken breast meat, cooked and cubed (about 2 large half breasts)
- 1 cup red or green grapes or pitted red or Rainier cherries, cut in half and seeds removed
- 2 stalks finely sliced celery
- ¾ cup coarsely chopped toasted walnuts or pecans
- ¼ – ½ cup mayo (I use homemade-BEGIN WITH JUST A BIT)
- 1 tsp curry powder
- Salt and pepper to taste
- Arugula or lettuce leaves for garnish
Salad Instructions
Start with just ¼ cup of mayo and mix with all of above. The mayo should barely coat the salad, not be gooey. Taste and adjust curry, salt and pepper. Add more mayo if desired. Makes about 5-6 side servings, or 4-5 main servings.