Happy New Year!

September 2013 on a cruise ship to Alaska...always cooking and learning

September 2013 on a cruise ship to Alaska…always cooking and learning

Happy New Year to all my readers!  I have a few resolutions to pass along:

  1. I am going to make a concerted effort to wear an apron and to change out of my nicer clothing when cooking since I seem to be spilling and splattering all over myself in the kitchen!
  2. My kitchen is going to have a huge clean out – inside cupboards, my freezer, pantry, drawers, you name it.  Whatever I haven’t used this past year will go in the “to be donated” pile for friends, family or charity.
  3. I am continuing with my Spanish Language learning.  Slow and steady and really hard, but I won’t give up!
  4. Since I love to cook, I have scheduled time with my friends who are a little challenged in the kitchen.  I’m looking forward to spending time together and cooking up some easy, delicious meals!

What are some of your cooking and travelling resolutions?

Share
Posted in uncategorized | 6 Comments

Belizian Banana Birthday Cake

Click here to view recipe.

Beautiful Banana Cake

Beautiful Banana Cake

My husband Wayne is immeasurably capable with everything in life: a true renaissance man.  I mean, this guy cuts his own hair, fixes 99% of things that need rewiring, replumbing, landscaping, reconnecting…you name it.  He cleans like no one else.  He can repair a  golf cart, lay tile, replace wood boards on a deck, perform a vasectomy in under 15 minutes. With all these duties on his more-than-capable shoulders, it has never been my husband’s job to cook.

That being said, I do recall when I was in my 40’s and our kids were all living at home.  I travelled with a friend to Bali for an Earthwatch trip, and he managed to take care of the house and three kids and their meals for three weeks!  Granted there was a lot of red jello, honey nut cheerios, purchased cinnamon rolls…but still he made pasta, chicken, vegetables,  brisket and my kids survived. He just doesn’t love to spend his time cooking.

Wonderful Wayne

Wonderful Wayne

So, while we were in Belize recently and my husband announced he was making me a banana cake for my birthday I thought “oh yeah, right.  YOU haven’t made a cake in about 40 years, and to try this in Belize?”  But I played along and smiled, expecting nothing.   Keep in mind that baking anything from scratch in Belize is challenging to say the least – impossible almost.  Just finding ingredients means driving to perhaps three different markets.  I have used my oven here only a handful of times – primarily to keep food warm or to make pizza.  That’s it.  There is a reason folks and restaurants here make cakes from a mix.

Regardless, we headed to town to run errands and he had the list of ingredients he needed: butter ($6.40 a pound in Belize) cake flour (NO, not available), sugar (granulated Americanized sugar came in 10 lb bags and was horrifically expensive, so he bought raw sugar), flour (you have to buy it in paper bags and even then it might be filled with bugs)…so you can imagine the searching and stops and frustration.  I did tell him, professional cook that I am, that one can make cake flour from cornstarch and regular flour.

The ingredients cost over 20 US dollars so we handed over the cash and headed home.

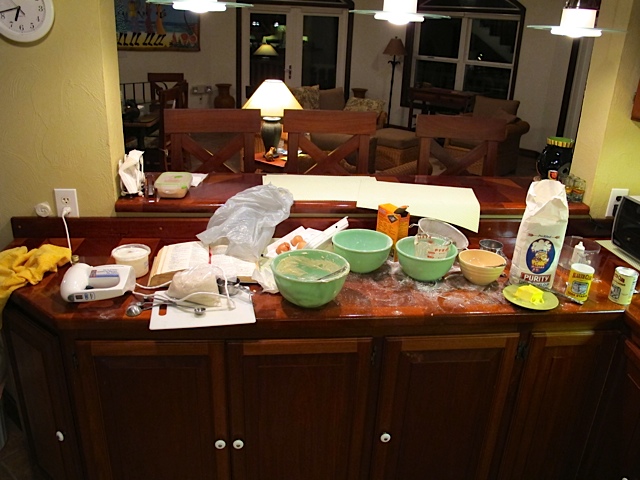
Two days later, at 6 pm, the flurry and preparations began.  I was told to mind my own business and so I knit, read and covertly watched the goings on.  We didn’t have two 9-inch cake pans so he used a 10-inch and an 8-inch flan or quasi cake pan.  Fair enough, he improvised  a cooling rack with the grates of our stovetop.  The sugar down here wouldn’t go through the holes of the sifter even after he blended the sugar–it was too damp.  And cake flour was created the old fashioned way.

I have my original copy of the Joy of Cooking in Belize – it is over 40 years old, stained and tattered from wear…and the last cake he made was a recipe from this book.  I must have been 22 or 23 at the time but we both remembered this cake as being light and moist.  Out came the book, he read the piece on how to make cakes.

My Beloved Joy of Cooking

My Beloved Joy of Cooking

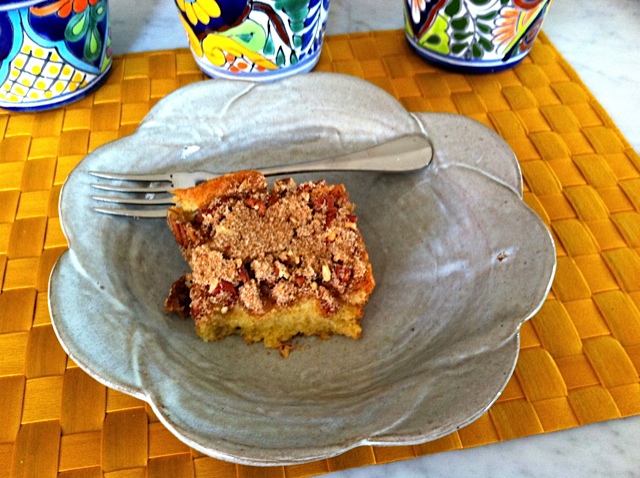
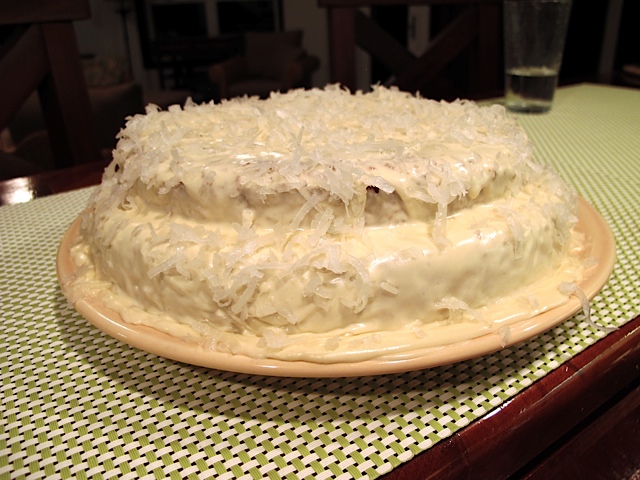
The cakes stuck to the bottom of the pan (he forgot to flour the shmeared butter to coat the pans) but that got patched.  Fresh bananas between the layers.  Powdered sugar icing and coconut flakes.  And he cleaned the incredible mess so that there wasn’t a trace of his antics.  At 8 pm we each ate two slices of the cake while it was a little warm and called it dinner.  And the next morning I couldn’t wait to come downstairs and slice off a sliver to eat with my coffee.

He has promised to make this again when my kids and their families visit us in Belize.  I’m on board with that!    And, I am shaking my head as I type this… but, while his cake didn’t look too professional, he knocked it out of the park.  I wouldn’t change his method a bit.  Nada.  Nunca.

After the storm

After the storm

Banana Coconut Cake

Adapted from my 1964 antique copy of Joy of Cooking

Serves 10-12 : makes two 9 x 9 inch rounds or or 9 x 15 inch cake pan

pf-icon2

Cake Ingredients:
  • 2 ¼ cups cake flour (sift before measuring)
  • ½ tsp aluminum free baking powder
  • ½ tsp table salt
  • ¾ tsp baking soda
  • 1 ½ cups granulated sugar, sifted
  • ½ cup salted butter
  • 2 eggs
  • 1 cup very ripe and peeled, then mashed bananas
  • 1 tsp pure vanilla extract
  • ¼ cup plain yogurt or buttermilk (we used yogurt-no buttermilk here)
Cake Instructions

Bring everything to room temperature before starting

Preheat oven with rack in the center to 350 degrees F

Grease and flour the bottoms and sides of your two cake pans or larger rectangular cake pan and set aside.  We used butter for this. Personally, next time I would butter the pan, put parchment to fit the bottom, then regrease and flour the top of the parchment so it doesn’t stick.

Sift cake flour. Then resift with baking powder, salt and baking soda. Set aside.

Combine the mashed bananas, vanilla and yogurt and set aside

Using a hand mixer, cream butter for 3 minutes, add eggs one at a time, beating well between eggs.

Add the sifted flour mixture gradually, alternating with the banana mixture in thirds.

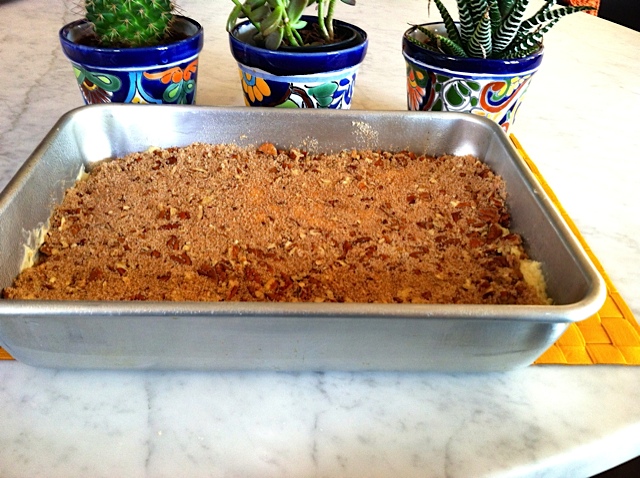
Place batter in the two cake pans or one larger pan and place in oven for 25-30 minutes until a toothpick inserted in the center of each comes out clean.  Remove from oven and cool on rack, then remove from pans after five minutes.

Meanwhile prepare the frosting:

Frosting Ingredients

Makes approximately one cup

  • Slightly less than 2 cups powdered sugar, sifted
  • 4 Tbsp soft butter
  • ¼ tsp salt
  • 2 tsp pure vanilla extract
  • evaporated milk if needed (regular milk would work too)
  • 2 ripe bananas, thinly sliced
  • 1 cup sweetened coconut flakes, optional
Frosting Instructions:

Beat butter with hand mixer and gradually add powdered sugar until creamy.  Add salt and vanilla, and continue beating.  Add evaporated milk to make a spreadable, not too thick frosting.  We added about ¼ cup of milk to ours.

Assembly

You can frost the cake while it is still warm!!  Do this!!

Put the first layer bottom (flat) side up on a large plate.  Cover the top with thinly sliced bananas.  Dot with about ⅛ cup of frosting to “glue” the layers together.

Put the next layer, flat side on the bottom to cover the first layer.  Spread the top and sides of the cake with icing, then sprinkle with coconut if desired.

Slice a nice wedge, pour a glass of milk or a cup of tea and enjoy.  Repeat.  Cover the cake well and refrigerate if you have leftovers.  Have for breakfast, lunch and dinner until it is gone.

Discard all other banana cake recipes you own – this will beat whatever recipe you have hands down.   And straight out of the fridge it tastes fantastic!

Share
Posted in Dessert | Tagged , , | 2 Comments

December Kitchen Essential – The Tongs

Two Terrific Tongs!

Two Terrific Tongs!

I was cooking the other day, making chicken soup, roasting veggies and then grilling bread for my last tomato salad of the season (<sigh>)…and it occurred to me in one of those “ah hah” moments that I reach for my kitchen tongs almost every time I cook.  I store three pairs of these in my kitchen and another set by my barbeque grill up on the rooftop.

One of my favorite kitchen tools, these are neither expensive nor difficult to keep in a drawer.  My old school pair doesn’t “lock” into place and those are the ones I use upstairs to barbeque – mainly for turning chicken pieces or steak or even veggies on the grill.  In my kitchen I have limited storage and I have a long pair for fishing chicken pieces and veggies out of my pressure cooker or soup pot.  The other two shorter pairs almost act as an extension of my arm – providing an easy way to flip roasted veggies, chicken thighs and many many other things.  The advantage is that the tongs actually grab the object you need – much better than a long fork that pierces food and easier than a spoon – which often proves too slippery for my tasks.

You can find these at most kitchen stores or restaurant supply places.  The kind that lock into place are convenient for storage if they go into a drawer.

Get yourself a couple of pair of these!!

Share
Posted in Kitchen Essentials, Wednesday Post | Tagged | Leave a comment

(NOT Granola) Power Bars

Click here to view recipe.

Beautiful Healthful Bar

Beautiful Healthful Bar

Lately, I am increasingly careful to have food ready to eat right after my early morning spin or strength training class.  Just a banana or apple won’t do, and I’m too impatient to wait for a protein shake.  Often I have errands to run on the way home from my gym and if I don’t have something nourishing and filling to eat, I get so hungry that I am tempted to go for anything in sight, healthful or not.

Enter my quest for a wonderful homemade bar.

I’ve never been a protein or granola bar person, and I don’t buy ready made snacks like these because when I look at the list of ingredients, I might just as well eat a dark chocolate covered Snickers.  But you know that I LOVE my granola!

So, I started in  pursuit of the perfect bar with my Granola recipe…and there are countless formulas in cyberspace and cookbooks that use nut butters and fruit mush to bind the granola and make oven-free bars.  Nah, I’m afraid I’m just not that into nut butter plus fruit.  To me that equals peanut butter and jelly. And I’m not enthralled with  rice cereal or rice krispies as a filler either!  And believe it or not, this is one place I forsake my chocolate obsession.

I envisioned something not too sugary and I tried many online recipes.  To me, chopped dates + craisins + honey + brown sugar + coconut equals over-the-top  sweet.  I am happy with the recipe below, and have these in the freezer-ready for after morning workouts or hikes, late afternoon  or just because.   I think they are really really really good.  Not a meal substitute, but a bar that keeps me energized and nourished while I wait for a “proper” meal.

After the first cutting – ready for the fridge!

On-The-Go Fruit/Nut/Grain Bars

Yields 16  2 x 2 inch bars

pf-icon2

Ingredients
  • 2 cups kamut flakes (If you can’t find these, old fashioned rolled oats are OK)
  • 1 cup chopped pecans (1/4 inch )
  • ¾ cup combo of pumpkin seeds and sunflower seeds (raw), or just pumpkin seeds
  • 1/2 cup raw wheat germ
  • 3 Tbsp butter
  • 2/3 cup honey
  • 1/4 cup dark brown sugar, lightly packed
  • ¼ tsp sea salt
  • ½ Tbsp pure vanilla extract
  • 1/2 cup chopped pitted prunes
  • 1/2 cup chopped dried apricots (California apricots are best for this)
  • 1/2 cup dried tart cherries
  • 1 tsp ground cinnamon
  • 2 Tbsp sesame seeds for the top
Instructions:

Preheat the oven to 350 degrees F. Butter a 9 x 9 or 10 x 10 inch baking dish and line it with parchment paper.  Butter the top of the parchment (the part that will touch the raw bars).

In a large mixing bowl, stir together  the kamut flakes, chopped pecans, sunflower seeds, pumpkin seeds and wheat germ and place them on a flat, parchment-lined sheet pan and bake for 12 minutes, stirring occasionally, until lightly browned. Transfer the mixture to a large metal mixing bowl.  Note: some wheat germ you purchase might say “ toasted” in which case do not toast again, just add after the rest of this mix comes out of the oven.

Reduce the oven temperature to 300 degrees F.

Place the butter, honey, brown sugar, vanilla, cinnamon and salt in a small saucepan and bring to a boil over medium heat. Cook and stir for one minute, then pour over the toasted oatmeal mixture. Add the prunes, apricots, and cherries and be sure everything is coated well.

Pour the mixture into the prepared pan. Wet your fingers and lightly press everything evenly into the pan. Sprinkle the top with sesame seeds and press in.  Push down on the mixture in the pan so everything is tightly compacted.

Bake for 30 minutes, until light golden brown. Remove from oven to a cooling rack.  Using a flat spatula, press down firmly all over the top to be sure the bars are again dense and compact.  I do this a couple of times while it is still warmish.  Cool for a total of  two or three hours before cutting into squares.

Remove from pan to a cutting board by putting the cutting board over the edges of the sheet pan and flipping it upside down.  This way the surface you cut will be perfectly flat.  Use a long knife and cut into 16 squares.  If there are any pieces that flake off, add them to your granola cereal.

I put the cut bars on a cutting board in the fridge overnight before recutting and wrapping each bar individually in waxed paper.  Store in the freezer airtight for up to two months. 

You can store these in an airtight container at room temperature for a week or two, as you would cookies.  I prefer to store mine in the freezer or refrigerator. I find that they stay crisper this way as all granola tends get softer at room temperature after a day or more.

Share
Posted in Odds & Ends | Tagged , | Leave a comment

Giving Thanks with Cauliflower & Pomegranate Seed Salad

Click here to view recipe.

Cauliflower with Pomegranate Seeds, Parsley and Hazelnuts

Cauliflower with Pomegranate Seeds, Parsley and Hazelnuts

This post was written following our 2012 family Thanksgiving.

23 people (including 4 toddlers) converged in the Seattle area. The stage was set…

Two deep fried turkeys. Ten side dishes. Four desserts.  And this was just for the Thursday Thanksgiving meal!  We all stayed in the mountains until mid-day Saturday – except for the two who drove back to the airport early on Friday so they could be at work Saturday :(.  This was THE BEST Thanksgiving to date. I know, I know … I say that every year – but it’s true!

Our Beautiful Buffet

Our Beautiful Buffet

Following our mid afternoon Thanksgiving meal, I chopped up the turkey carcasses and proceeded to make two huge pots of Turkey soup.  There was enough for an army – well over a couple of gallons – but I must tell you that we had only about six cups of soup left Saturday noon when all was said and done.

We ate through three dozen bagels, a side of lox, four pounds of cream cheese, countless cups of granola, three boxes of satsumas, 17.5 pounds of king salmon, two huge trays of squash laden mac and cheese, tubs and tubs of yogurt, two gallons of orange juice… Suffice it to say that no one left hungry and that the weekend turned into an eating fest.

We played countless competitive games of Scrabble, books were read, conversations ensued, hikes and mushroom hunting, runs up the trails, face painting…such great activities that probably happen because there is not a television set in sight and my brother’s place is without Internet connectivity. Not even phone coverage.  It felt like the good old days…and made me realize that even though we have the electronics and gadgetry to find anything in minutes, magic occurs when the devices are removed and we are actually face to face, conversation to conversation with each other.  Cousins getting to know cousins, sisters and brothers and in-laws laughing and telling stories and just catching up.

Shira and Kids at the Kids Table

Shira and Kids at the Kids Table

I am featuring a recipe that came from an older New York Times November 2012 “vegetarian” Thanksgiving special: Cauliflower with pomegranate seeds, parsley and hazelnuts.  It was beautiful, texturally pleasing, easy and in my world a blue ribbon winner.  The spices in the salad dressing were warming and quite unusual.  Interestingly, this recipe originated in an Israeli cookbook, Jerusalem. We’ll definitely be making this salad again this year while the pomegranates are in season.

Cauliflower with Pomegranate Seeds, Parsley and Hazelnuts

Yield: 6+ servings

pf-icon2

Ingredients
  • 1 head cauliflower, broken into small florets (1 1/2 pounds total)
  • 5 tablespoons olive oil
  • 1 large celery stalk, cut on an angle into 1/4-inch slices (2/3 cup total)
  • 5 tablespoons hazelnuts, with skins
  • 1/3 cup small flat-leaf parsley leaves, picked
  • 1/3 cup pomegranate seeds (from about 1/2 medium pomegranate)
  • Generous 1/4 teaspoon ground cinnamon
  • Generous 1/4 teaspoon ground allspice
  • 1 tablespoon sherry vinegar
  • 1 teaspoon maple syrup
  • Salt and freshly ground black pepper
Instructions

Preheat oven to 425 degrees.

Mix the cauliflower with three  tablespoons of the olive oil, 1/2 teaspoon salt and some black pepper. Spread out in a roasting pan and roast on the top oven rack for 25 to 35 minutes, until the cauliflower is crisp and parts of it have turned golden brown. Transfer to a large mixing bowl and set aside to cool.

Decrease the oven temperature to 325 degrees. Spread the hazelnuts on a baking sheet lined with parchment paper and roast for 17 minutes.

Add cauliflower to a large bowl along with the remaining oil and the rest of the ingredients. Stir, taste and season with salt and pepper accordingly. Serve at room temperature.

Share
Posted in Salads & Dressings, Side Dish, Vegetables | Tagged , , | Leave a comment

Super Sour Cream Pecan Coffee Cake

Click here to view recipe.

Piece of cake!

Piece of cake!

This is another special recipe from  my “favorites” category.  This old fashioned, rich coffee cake frequently appears for brunch or breakfast celebrations at my home, and when it bakes in the oven the entire house smells like butter and vanilla.  I’ve had numerous requests for this particular coffee cake over the years.  Nothing could be easier or as foolproof as this formula!

The next time you have company for brunch, serve this with coffee or tea.  It makes a large cake pan full and I often freeze half of it.  Just a sliver of this perfectly balanced cake satisfies anyone’s sweet tooth… I’ve even been known to serve this for dessert following dinner!

Pan full of goodness - ready for the oven

Pan full of goodness – ready for the oven

Sour Cream Pecan Coffee Cake

pf-icon2


Cake ingredients:
  • 1 cup salted butter
  • 1 cup granulated sugar
  • 2 large eggs
  • 1 tsp. vanilla extract
  • 1 cup sour cream
  • 2 cups all purpose unbleached flour
  • 1/2 tsp. table salt
  • 1 tsp. baking soda
Topping ingredients
  • 1/2 cup granulated sugar
  • 1/3 c dark brown sugar
  • 1 cup coarsely chopped  pecans
  • 1 tsp. ground cinnamon
Instructions:

Have all ingredients at room temperature.  Position a rack in the middle of your oven and preheat to 350 degrees.  Grease with butter and flour the bottom and sides of a 9 x 12 cake pan and set aside.

Combine flour, soda and salt and stir well and put aside.

Cream butter and sugar for four minutes, then add eggs one at a time until well blended. Add vanilla and then the sour cream, making sure it is incorporated.

Quickly add the flour mixture in two batches and mix until combined.  Put batter in the cake pan, evening out the top.  The raw mixture is thick and can be a bit difficult to spread.

Combine topping ingredients, mix thoroughly and evenly sprinkle on top of the cake.  Press down lightly with the palms of your hands all over the top so the sugar-nut mixture doesn’t come off.  Bake for 30+ minutes.  BE SURE IT IS DONE by testing with a toothpick.  Remove to a rack and cool completely.  Covered, this stays moist at room temperature for 4-5 days or can be frozen for up to two months.


Share
Posted in Breads, Breakfast | Tagged | 2 Comments

Lentil & Squash Fall Salad

Click here to view recipe.

Lovely Lentil & Squash Fall Salad

Lovely Lentil & Squash Fall Salad

I don’t know if I should really call this creation a “salad” – it’s  more of a vegetable medley.  All I know is that I began with an old recipe that called for asparagus and squash, started adding and subtracting and came up with not only a wonderfully filling but a visually appealing dish. The original recipe called for 400 grams of canned lentils.  Canned?  NOOOOOO. Not in my kitchen!

All the vegetables came from our weekly farmers market.  I might even try this another fall day with halved roasted brussels sprouts in place of green beans.  I made this with my friend while we cooked together on a recent Monday morning, and we made an entire one pound package of brown lentils, used half for this recipe and kept the other lentils for another day. (I served my lentils with sauteed leeks, carrots, yellow pepper, and fresh herbs.)

As an aside, I love to add lentils to soups, salads (just today I put ½ cup or so of plain lentils on top of my arugula salad) and just about anything else that isn’t too weird.  They are inexpensive, and they only take 20 minutes to cook.  Plus they are high in fiber, iron, protein and minerals!

Lentil & Squash Fall Salad

Serves 8

pf-icon2

Ingredients
  • 2 ½ lb butternut squash-seeded and peeled and cut up
  • 
2 red onions, halved lengthwise, then cut in half again and, cut into ⅛ inch slices
  • 2 Tbsp extra virgin olive oil
  • 
1 Tbsp good quality balsamic vinegar
  • 1 pound green beans, cut off ends and cut into 1” pieces
  • 1 tsp olive oil
  • 
2 garlic cloves, minced
  • 2 tsp ground cumin
  • ½ lb  dry brown lentils, rinsed, drained and cooked according to package directions
  • Crumbled feta cheese to top the salad if you wish (I didn’t put cheese on mine)
Instructions

Prepare squash by softening for about five minutes in the microwave (see Squash Ravioli description). Peel, seed and cut into ¾ inch squares.

Preheat oven to 400 degrees.  Line two rimmed baking trays with parchment paper.  Toss the squash and onions with the olive oil, garlic and cumin and place them on the lined tray. Drizzle with the balsamic vinegar. Season with salt and ground pepper. Bake for 30 minutes or until tender.  Remove from oven and cool completely.  Your kitchen will smell great at this point!

Meanwhile, blanch the green beans in an uncovered pot of salted boiling water for a few minutes so they are still green and a bit “crunchy” – just two minutes or so.  Remove to a large bowl of ice water and when cooled completely, drain beans on a clean dish cloth.

When everything has cooled to room temperature, combine beans, squash, onions and lentils.  Store in refrigerator.  When ready to eat, bring this to room temperature and drizzle with a mixture of one tablespoon balsamic vinegar, 1 ½ tablespoons good olive oil and a pinch of dry mustard.  Alternately, try adding some thinned tehina sauce to the salad along with toasted sesame seeds to top – a totally different but equally delicious version.

Share
Posted in Salads & Dressings, Side Dish, Vegetables | Tagged , , | Leave a comment

Israeli-Inspired Meat Patties

Click here to view recipe.

Marvelous Meat Patties with Tehina Sauce

Marvelous Meat Patties with Tehina Sauce

I can’t believe it’s been a year since I was in Israel!  I go through my photos pretty regularly and have decided, along with my husband, that we must return in short order to explore some of the places we didn’t have time for last year.  A driving force for my longing to travel there again?  THE FOOD, of course.  Everything is so darned good and fresh and tasty!

Beautiful Dizengoff Square in Tel Aviv

Beautiful Dizengoff Square in Tel Aviv

One of the items I ordered and ate pretty often were meat patties, mostly at stands owned by Arabic or Lebanese Israelis.  The ground nuts mixed with meat and warming spices gave them a bit of interesting texture – definitely not your average meat patty!  They were sometimes served inside warm pita bread.  I have played with several recipes for these aromatic ground beef (or ground lamb) darlings, and have topped them with a tehina sauce and once with a yogurt-cucumber sauce (kind of Greek) — not very kosher, I know.

I have a wonderful meat market close to home – A & J Meats.  They have the best  single source, organic, 85% lean ground chuck that I use for this, and I’ve made the recipe with ground lamb as well.  Both beef and lamb taste great here so it is really up to you!

Often I make a double recipe of  these patties and freeze half raw on a waxed paper  lined cookie sheet. Then when they are solidly frozen, I plop them into a freezer container and then remove a few as needed for those evenings I am uninspired or too busy to cook!

Israeli-Inspired Meat Patties

Serves 4-6

pf-icon2

Ingredients:
  • 1 ¼ lb 85% lean ground beef or ground lamb
  • ½ cup white onion, peel and mince to ¼”
  • 3 Tbsp tomato paste
  • Grated zest of 1/2 large lemon  (I use a microplane grater)
  • Juice of 1/2 large lemon
  • 1 tsp ground cinnamon
  • ½ tsp ground nutmeg
  • ½ tsp ground cloves
  • 1/2 tsp cayenne (more if you are spicy!)
  • 1/4 cup chopped blanched almonds (I buy them slivered in bulk then put them in a baggie, roll with a rolling pin to get them fairly fine)
  • 1 tsp salt
  • 10 grinds of  ground black pepper
  • 1 Tbsp extra-virgin olive oil (for frying)
The Ingredients

The Ingredients

Instructions

Make the patties: Combine everything except olive oil in a large bowl and knead well with your hands until well combined. I wear disposable gloves for this task, always.  Firmly form the mixture with your hands into two-inch long, slightly oval  patties and set aside. Because there are no eggs or bread crumbs in this recipe to bind the meat, you will need press them tightly or they will break apart when you cook them.  I always refrigerate them for at least an hour which seems to keep them intact.

When ready to cook the meat,  heat a  large 12-inch sauté pan, drizzle in a thin film of olive oil and heat over medium-high heat until the oil begins to shimmer. Add the oval discs  one at time, leaving space between them. I  fry them in two batches.  Lower  the heat to medium and brown the patties on both sides, turning gently to keep them from falling apart. Remove them to a rimmed platter  when their centers are no longer pink

Serve with a tehina or yogurt sauce.

Yogurt Cucumber Sauce

Ingredients
  • ½ unpeeled English cucumber, shredded on a box grater
  • 1 cup 2 % Greek yogurt
  • ¼ cup finely diced Anaheim chili , minced.
  • Salt and freshly ground black pepper
Instructions

Combine all the ingredients in a medium-sized bowl and let the flavors come together for at least an hour  in the refrigerator before serving.  Also good as a dip, or add radishes, carrots and even tomato for a salad type dish. Stir before using as the cucumber makes this more watery over time.

Tehina Sauce

Note: I recently discovered THE BEST TEHINA I HAVE EVER EATEN, bar none.  Read the Soom Foods story and you’ll start to understand why I am a believer.  I am a convert.  I am ordering a case of this stuff and if any of you readers in Seattle want some, let me know and I’ll include your order with mine to save shipping money.  I only hope that the markets here will get smart and start carrying Soom tehina.  It is much milder and richer and more liquid in texture than the brands I have used in the past.  I make a variation of tehina sauce written on the back of the bottle:

Ingredients
  • ½ cup Soom Foods Tehina
  • Juice of 1 lemon
  • 1 garlic clove, crushed
  • ¼ tsp sea salt
  • ¼ cup cold water
Instructions

Whisk all ingredients  together – it will take a little elbow grease to get this combined and beat out all the lumps.  Add more water if you prefer a thinner dip (I added a lot more water and it was still thick).  This will keep in the fridge for a week at least and I use this to mix with grilled veggies, as a dip for crackers, on top of chicken or meat … endless possibilities!

Share
Posted in Meat, Middle East | Tagged , , | Leave a comment

Jamaica – A Heavenly Hibiscus Beverage

Click here to view recipe.

Beautiful Jamaica Beverage

Beautiful Jamaica Beverage

As one of my latest adventures … I’m trying to learn conversational Spanish!  I figure it’s good for my aging brain, and I’ve always regretted that I didn’t master another language during my early years.  High school French isn’t that useful to me, and frankly I can understand a lot of this beautiful language, but I’m not ale to say more than a few words.  Years and years of Hebrew school?  Priceless but useless for me.

Spanish, though, is a language I long to speak – especially during my frequent trips to Belize.  English is the country’s official language, but most construction workers and restaurant workers converse in Spanish.  So I bought a computer program and tried to learn that way.  For me, though, I perform best when I converse with native Spanish speakers.  I don’t mind trying and sounding less than fluent – as long as I can communicate.

A couple of months ago I found my teacher, Norma, who hails from Mexico City but lives close to me in Seattle.  Once a week we meet for an hour and speak (well, mostly she speaks) in Spanish.

It didn’t take that long for the topic of food and cooking to come up.  I brought her some of my homemade tomato sauce (she calls it “salsa”) and she gave me some dried Hibiscus flowers to make tea.  She told me how to do it, and now I am in love with Jamaica (pronounced “ha my ick a”).  This is one of the beverages found on the streets along with Horchata in Mexico City.

Norma thought I would only be able to find the Hibiscus flowers at a Mexican tienda in town but I actually found them at Pacific Food Importers where I often get spices, beans, and cheeses.  I now have a huge bag of dried flowers in my pantry and make this tea quite often.

Jamaica concentrate

Jamaica concentrate

Jamaica Hibiscus Beverage

Makes 6 large glasses

pf-icon2

Ingredients
  • 1 quart water, half to start and half later
  • ¼ cup turbinado (raw) sugar
  • ½  cup dried hibiscus flowers
  • A few thin slices  of fresh ginger (about one tablespoon of unpeeled slices)
  • 1 dry star anise (omit if you aren’t a licorice fan and use one inch piece of cinnamon instead
  • Lime juice (optional – I don’t use it)
  • Orange or lime slices for garnish
Instructions

Put two cups of the water and the sugar in a medium saucepan. Add star anise (or cinnamon) and ginger slices and heat until boiling and the sugar has dissolved. Remove from heat. Stir in the dried hibiscus flowers.

Cover and let sit for 20 minutes. Strain into a pitcher and discard the used hibiscus flowers, ginger, and star anise (or cinnamon).

At this point you can store the concentrate in the refrigerator until you’re ready to make the drink.

When ready to serve, reconstitute the concentrate half with this mix and half with  water or seltzer water, pour over ice and garnish with a fresh lime or orange slice. This makes good tea if you use hot water too!

Share
Posted in Beverage, Central America | Leave a comment

Cream of Chanterelle Soup

Click here to view recipe.

Freshly Foraged Chanterelles

Freshly Foraged Chanterelles

The following recipe and post came from my “baby” brother, Kal. Kal lives in Seattle and we share recipes back and forth almost weekly. I think (really, I know) he is a better baker than I and he makes dinner for his wife and for himself nightly – always using fresh, local ingredients. The funny thing is that there have been times when I have tried a new recipe published in the New York Times or Seattle Times, and without consulting each other, Kal makes the same recipe the same night – using the SAME SUBSTITUTIONS!

Kal’s Ode to Fungi

Fall mushroom season is something we all look forward to in our family, especially around Thanksgiving. Several years ago we introduced the young ones (age is relative here) to mushroom hunting and you would think they all discovered a new invention or something. Especially with the youngest, any time you find something they prefer over electronics, you know you hit it big. Now every year for Thanksgiving, no one ever asks about what we’re making for the meal. All they want to know is when we get to go mushroom hunting.

Being a recreational forager, I stick with the most easily identifiable and edible fungi. Chanterelles are my favorite. Also called “golden chanterelles”, they are not all alike.European and Asian forms are about as big as my thumb. But in the Pacific Northwest, we get the best and they can be the size of a dinner plate, with average mushrooms coming in at two or three inches across.

So first we have to forage and collect our mushrooms. A good spot in the woods can easily yield a few pounds in a matter of minutes if you’re lucky. They love deep mossy ground around Douglas Fir trees. But it takes time to trim, wash and dry. The grocery store variety is acceptable for this soup recipe, but at $20.00 a pound, which I just saw the other day, I’ll pass. Plus, you just can’t match the freshness of picking and cooking the same day.

Cream of Chanterelle Soup

Cream of Chanterelle Soup

Cream of Chanterelle Soup

Serves 6

pf-icon2


Ingredients
  • 2 cups chanterelle mushrooms
  • ½ medium onion, diced
  • 2 garlic cloves, minced
  • 2 T butter
  • 1 celery stalk, diced
  • 2 cups chicken broth
  • 2 T fresh sage, chopped
  • 1 ½ cups cream or half & half
Instructions

Clean and chop mushrooms into large pieces. Set aside to dry on paper towels.

Sauté the mushrooms, onion, garlic and celery over low heat in butter until onion and mushrooms are soft. Pour off most of the liquid. Then add kosher salt and freshly ground black pepper. Add 2 cups chicken broth and keep on low heat until the liquid is reduced by about half (about 10 minutes). As a nice variation, you can add a few strands of saffron at this point. Take out about half the mushrooms with a slotted spoon and set aside.

Lots of Liquid from Sauteeing

Lots of Liquid from Sauteeing

Add fresh sage, then transfer the rest of the cooked soup into a blender and puree. Return this to the soup pot, add salt and pepper to taste, if needed. Temper the cream (heat slowly and be careful not to boil) then add to the soup, slowly whisking. Simmer until thickened again. Serve with reserved, large, chopped mushrooms on top.

Share
Posted in Soups | Tagged | 1 Comment