Click here to view recipe.
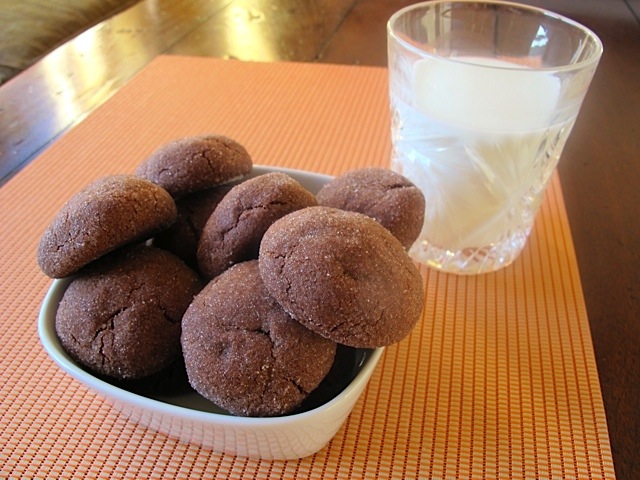
Marvelous Cookies (and milk)
I cannot believe I am writing about yet another type of dessert I’ve just made. If we spoke face to face, I’d assure you that I prefer savory food, that I don’t like weird (to me) combinations like cayenne and black pepper and chocolate and cinnamon and coffee altogether, ever. So when my middle sister Susan came to town last November and announced that she wanted to make these concoctions for Thanksgiving, I protested heartily, confident in my belief that they wouldn’t do a thing for me.
BOY WAS I WRONG! She pulled a few out of the oven and gave me a tiny bag (just five cookies) of these to take home. I popped one into my mouth as I was driving back from the knitting shop and …Oh-My-Goodness. The flavors were subtle and the spiciness came at the end of the bite. I begged for the recipe, which Susan got from her friend Jill who got it from Momofuku in New York. A close version appeared all over the internet with minor variations as well, some adding nuts, some with semi-sweet chocolate, some with more or less spice, some with allspice, some rolled in cinnamon..some recipes posted as far back as 2002. The more things change, the more they stay the same, I suppose.
Susan’s cookie recipe is now included with my computer recipes under “cookies” … but also under “things I love.” And I’m sharing her recipe with you. These one or two bite beauties are the perfect ending to a nice meal, just my style. And the word “Mayan” in the recipe? Ha! Mayan refers to a culture or civilization of indigenous people mainly in Central America who had a big hand in discovering the wonderful world of chocolate. I’ve visited Mayan ruins in Belize, Mexico and Guatemala so the word resonates with me.
Just wait until you bite into this plain looking cookie and dark warm chocolate comes forth, followed by an intoxicatingly spicy aftertaste. Just wait…
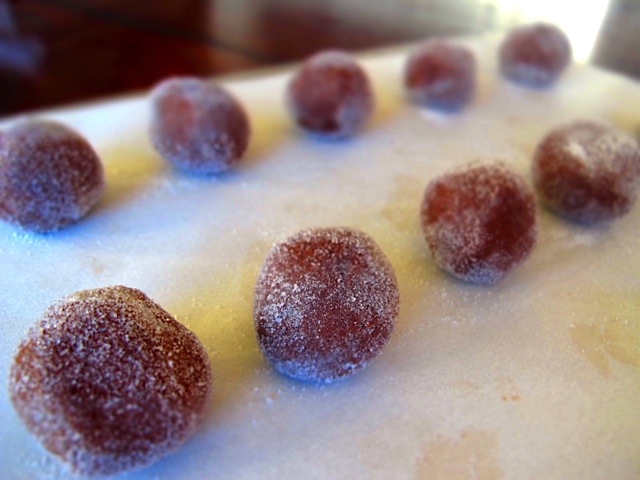
Balls of love
Mayan Chocolate Cookies
…via Susan via Jill via Momofuko but who knows where the recipe originated: with my changes and explanations
Yield about 3 dozen cookies

Ingredients:
- 3/4 cup (1 ½ sticks) salted butter, room temperature
- 1 cup granulated sugar, divided ( ¾ for the dry ingredients/dough and ¼ for rolling the cookies)
- 1 1⁄2 cups all purpose flour
-
1 1⁄2 tsp aluminum free baking powder
-
1⁄2 tsp fine sea salt
or table salt
- 1⁄2 tsp ground cinnamon
-
1 tsp instant espresso powder
- 1/4 tsp ground cayenne pepper
-
1⁄4 tsp fine ground black pepper (I used pre-ground)
-
3⁄4 cup unsweetened Scharfenberger or other great quality cocoa powder
-
1 large egg, room temperature
-
2 tsp pure vanilla
extract
- 1⁄2 cup bittersweet chocolate chips (I use Guittard 60% -they are pretty big so if you prefer semi sweet chocolate chips, use five per cookie rather than three)
Instructions:
Sift flour, baking powder, salt, cinnamon, espresso powder, cayenne, ground pepper and cocoa powder in a medium bowl and stir to combine.
In a small cup combine egg and vanilla.
Using an electric micr beat butter with 3/4 cup sugar for six minutes on high speed. This will make the cookies lighter in texture, so don’t omit this step. I actually set a timer, impatient person that I am. Lower speed and add egg and vanilla until incorporated.
Add sifted dry ingredients together in three batches and stop the mixer when everything is evenly combined. Do not overmix.
Cover the bowl of dough and refrigerate (it will be thick) for a half hour.
Preheat oven to 350.
Roll a piece of dough the size of a walnut (about 1 inch in diameter) in between the palms of your hand. Press an indentation in the center of the ball and place three of the large chocolate chips in the center, and then mold the dough around the chips. Roll into a smooth ball and coat in the 1⁄4 cup sugar that was set aside. Place on parchment paper on baking sheet. I put 18 cookies per sheet since they don’t spread much.
Bake for eight minutes. Let them cool on the cookie sheets.They form cute little half domes. Let them rest five minutes or so.
Note: these are the best right out of the oven while the centers are gooey and chocolaty. OR I put the pre-baked, room temperature cookies in my handy preheated toaster oven at 300 degrees for two minutes. OR I zap a few in the microwave for 8 seconds. In addition, I roll the raw cookies in sugar, just like before baking them but “flash freeze” the raw balls of dough on a parchment lined cookie sheet in the freezer. Once solid I store them in a ziplock container, then remove a few for 45 minutes before I bake them in the toaster oven. This way you can do a few at a time and they are always fresh.